-
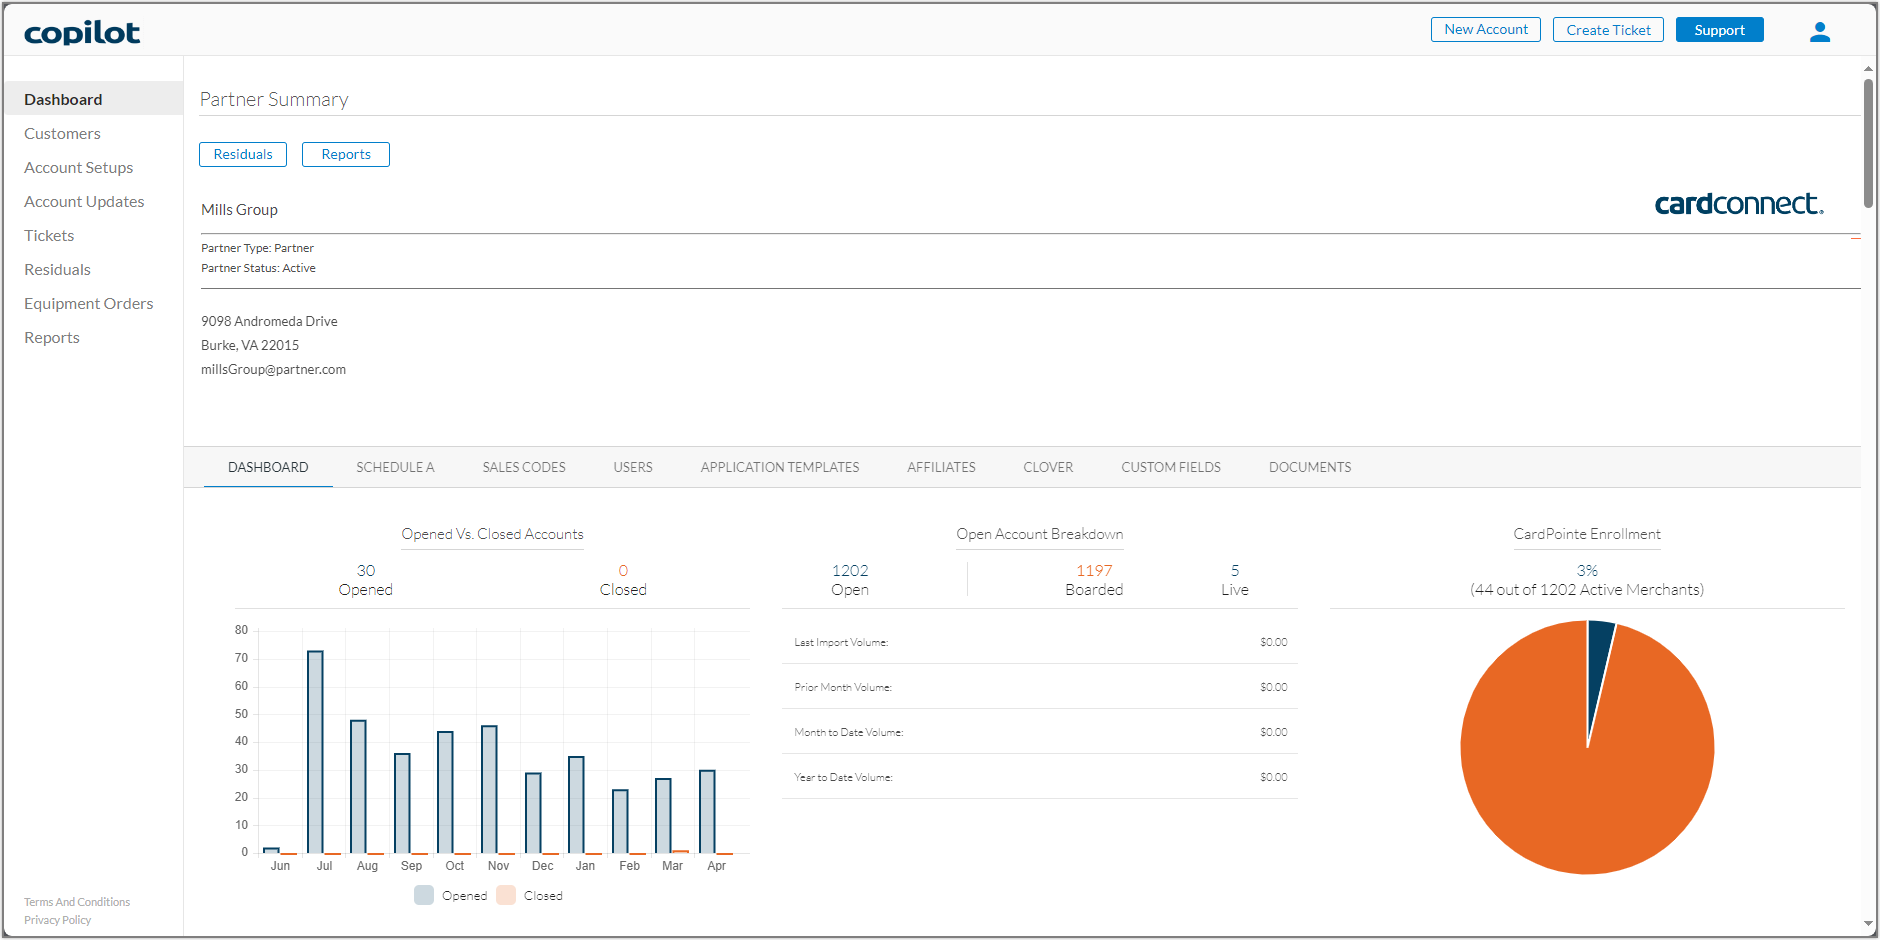
Partner Detail Card - Displays your business contact information. We provide this information to merchants upon request, so it is important that this information is accurate.
-
View Residuals - Click to view your residual reports. Residual reports are also accessible by clicking Residuals in the left nav of CoPilot.
-
Dashboard Sub-tabs - Select a tab to perform various business management functions:
- Partner Summary - Displays visual graphs that provide a glimpse into your key performance indicators.
- Schedule A - Displays a list of schedule A information.
- Sales Codes - Displays a list of sales codes.
- Users - Allows you to add, edit, or delete CoPilot user accounts. In addition, you can configure each user's permission settings and email notification settings, giving you complete control of how your users interact with CoPilot.
- Application Templates - Allows you to create reusable templates that contain pre-populated products and pricing information.
- Affiliates - Display a list of your business affiliates and their contact information.
-
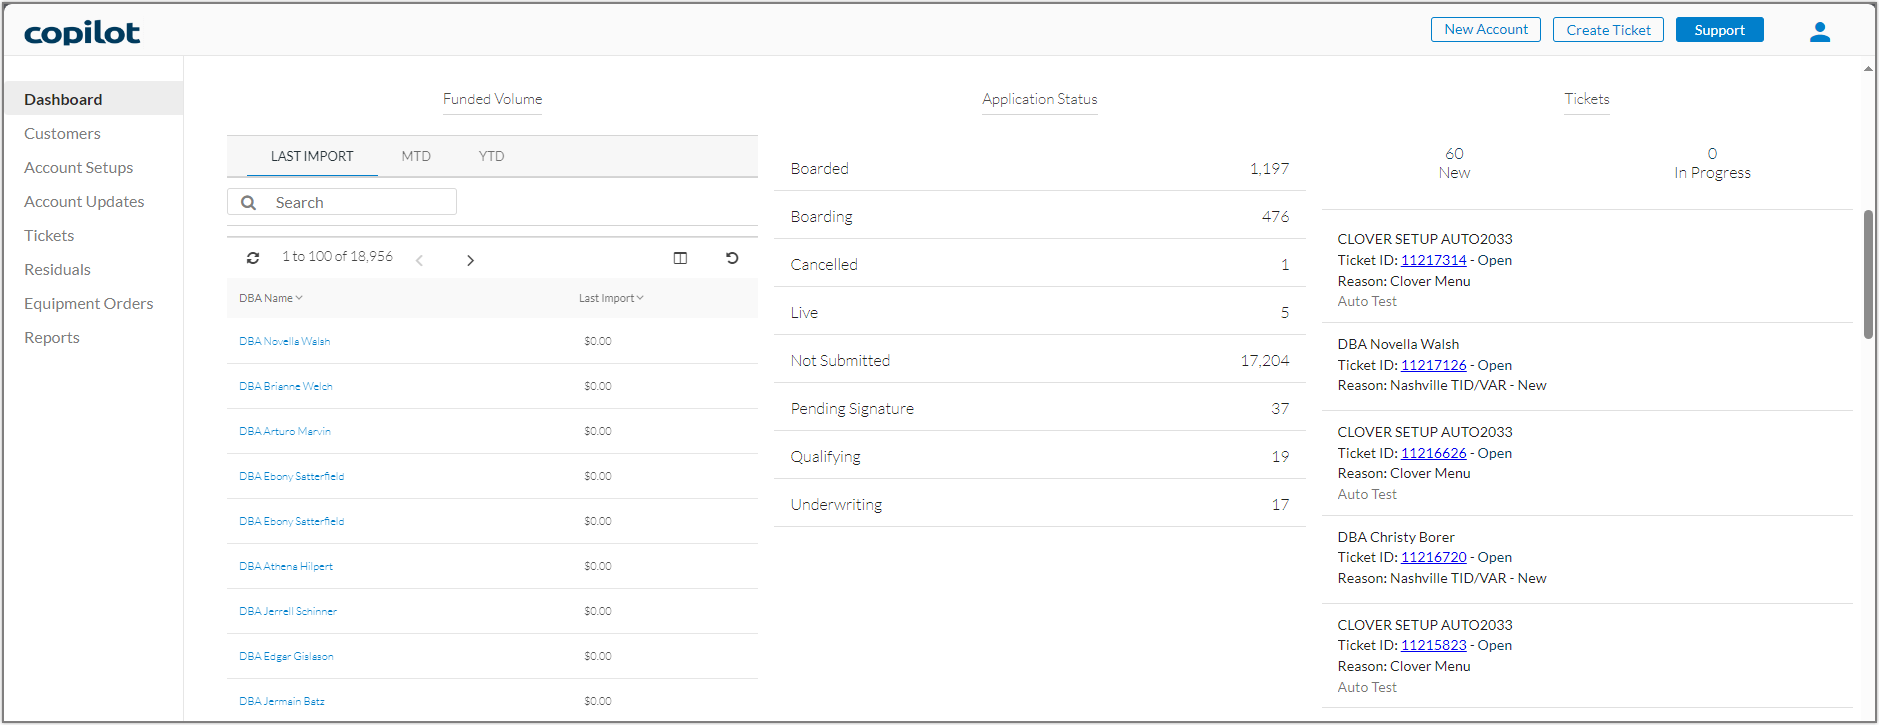
Key Performance Indicators - Graphs and tables that provide a high-level view of important business metrics.
- Selecting a merchant name within the Recent Deposits table displays the Merchant Detail card.
- Selecting an entry from the Tickets table displays that ticket's support information.

Terminology
It is important to understand the following nomenclature when working in CoPilot:
- Merchants are referred to as customers. A customer can have one or more Accounts/Merchants IDs.
- Accounts/Merchant IDs (MIDs) are synonymous with one another and are referred to as accounts in CoPilot. Accounts can have one or more products and/or services.
To catch up on previous releases, see the CoPilot Release Notes page.
CoPilot 5.59 Release (7/15/24)
This release includes the following enhancements and updates as well as additional backend enhancements and fixes:
- Account Tax Information Added for Backup Withholding
- Obsolete Paperless Statements Button Removal
- Continued Self-Service Account Updates
- Update Details Page
Account Tax Information Added for Backup Withholding
In CoPilot, a merchant's current IRS Tax ID Verification status can be found on the merchant's Account Detail page under the Legal Information section.
An account that may incur backup withholding will be listed as Invalid under the IRS Tax ID Verification field under Account Details in CoPilot. However, backup withholdings can still be placed on accounts listed as Valid.
To verify whether an account is incurring a backup withholding, click on View Details button to open a modal displaying an account's tax information.
For more information, please review our documentation on Verifying Tax and Backup Withholding Information.
Obsolete Paperless Statements Button Removal
As all users can download statements in CoPilot and CardPointe, the Paperless Statement setting option is no longer needed and was removed.
Continued Self-Service Account Updates
Update Details Page
The following updates were made to the Update Details pages. All changes made by the user to information on this page are saved to the History section of the Update Details page.
Comments
Comments can be added by Partners to an update if the Update Status is not Completed, Cancelled, or Declined by clicking the Add Comment button.
Attachments Section
The new Attachment section in the Update Details pages allows Partners to add or delete attachments for change requests if the Update Status is not Completed, Cancelled, or Declined. Users can add attachments by clicking the Add File(s) button. Attachment files must be smaller than 100 MB.
These attachments will appear in the table in the Attachments section for the account. The attachments will be given an Account Update type. Partner users can delete attached files by navigating to the Attachments tab.
Adding and deleting attachment files will be reported in the History Tab.
History Section Update
The History section located at the bottom of Update Details pages was updated to handle new information for change requests such as status changes, and assignment changes, among other requests.
This section now contains the following fields:
| Field Name | Description |
|---|---|
| Date Changed | The datetime stamp of when the last change to the update was made. |
| Changed By | The user or service that made the change. |
| Update Status | The current Update Status is in green while previous statuses are in red and strikethrough text. |
| Assigned To | The current assignee's name will display in green text while the previous assignees's names will display in red and strikethrough text. |
| Attachment | Added attachment names will display in green text while the names of deleted attachments will display in red and strikethrough text. |
| Comment | A text comment that was added to an update by a user. |
This table is listed in chronological order with the update with the most recent Date Changed datetime stamp listed at the top.
Delivery Address Changed to Mail to Address
The Delivery Address field name was changed to Mail To.
Accessing CoPilot
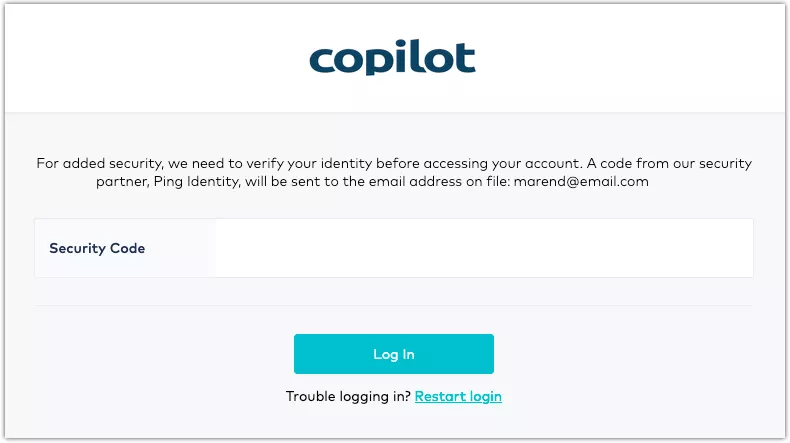
Accessing CoPilot requires your login credentials as well as a one-time security code sent via email as additional authentication. The one-time security code is sent to your registered email address from our security partner, Ping Identity.
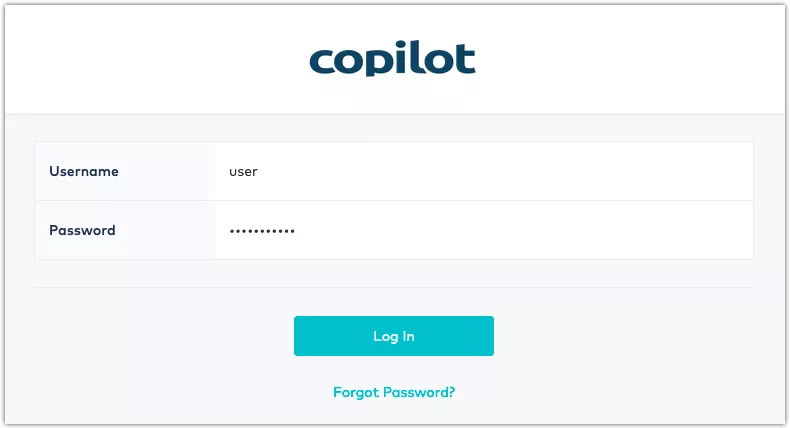
Step 1:
To access CoPilot, navigate to https://copilot.cardpointe.com and enter your login credentials.
Your CoPilot and CardPointe login credentials are the same.
Multiple attempts to log into your account with incorrect credentials will result in a temporary (30 minute) lock on your account. The following notification displays on the log in screen:
"Account is temporarily disabled. Contact admin or try again later."
Continued attempts during the lockout period add 30 minutes each to the duration of the lockout.
Additionally, changing your password while your account islocked does not cancel or otherwise affect the lockout period. Instead, you can log in with the new password once the lockout period has ended.
If you are locked out of your account and cannot regain access, contact support for assistance.
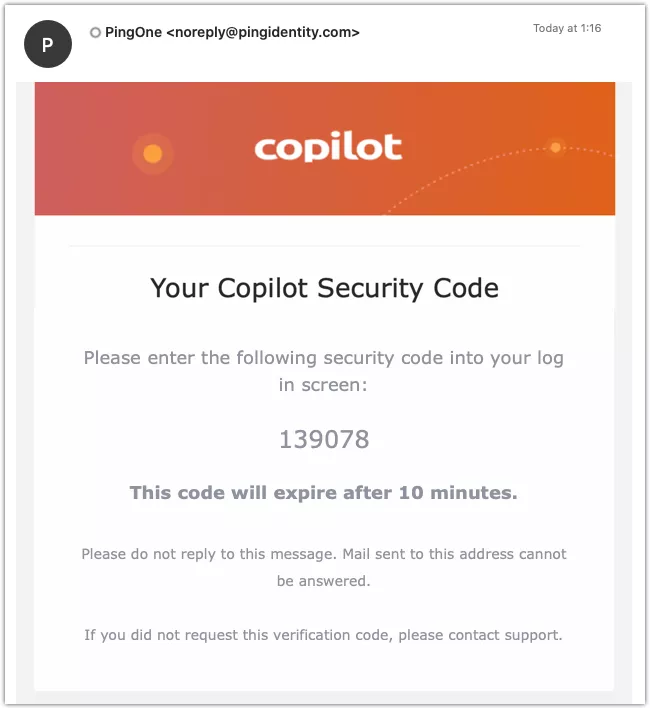
Step 3:
Access your email account to view the email from PingOne <noreply@pingidentity.com> containing your one-time security code.
If you do not currently have access to the email account associated with your CoPilot account, contact support for assistance.
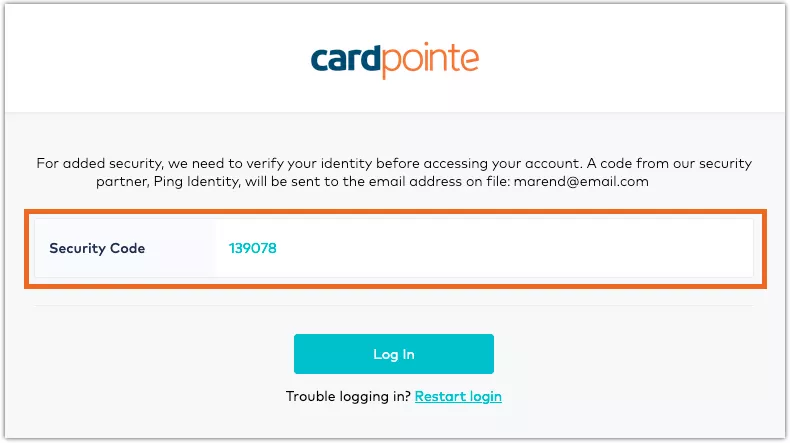
Step 4:
Enter the one-time security code provided in the email to authenticate yourself and complete the login process.
Subsequent logins will require the one-time security code only once every few days.
CoPilot Dashboard
The Dashboard provides a high-level overview of your business's key performance indicators and provides easy access to various useful business management features, including Application Templates. Refer to the image below and the corresponding descriptions to understand how to navigate this screen.
Application Templates
Application Templates allow you to create reusable templates that contain predefined merchant services product features, CardPointe product features, and pricing fields.
Application Templates are useful if you have merchants that run similar business types. For instance, if you service numerous restaurants and other merchants in the food services industry, you can create and reuse an application template that is specific to those business types, streamlining the application process.
Creating a New Application Template
-
Click Dashboard in the left nav, and then select Application Templates.
-
Click New Template.
-
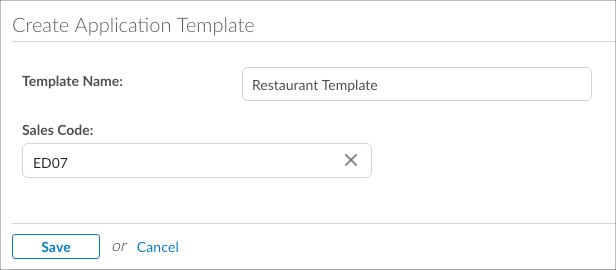
Enter a name for the template in the Template Name field. For instance, if this is a template that you wish to reuse for restaurant applications, you may choose to name it "Restaurant Template".
-
Enter your sales code in the Sales Code field, and click Save.
-
To configure the template to your needs, complete the information within the Setup, Processing Information, Merchant Services, and Add-Ons tabs.
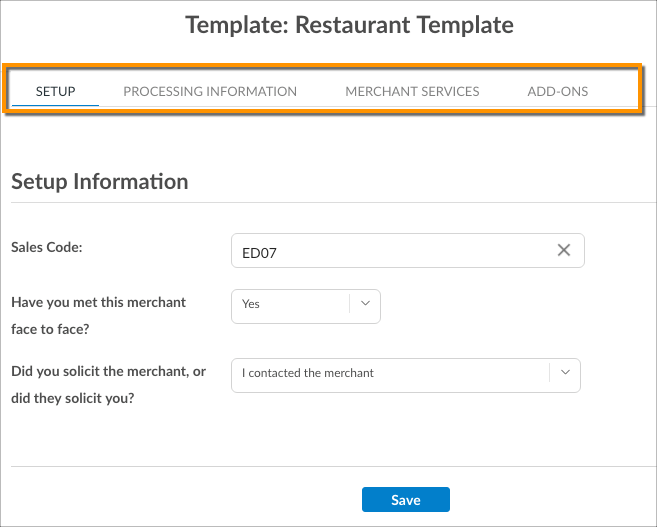
Note: Application Templates can be modified at any time. Simply navigate to Dashboard > Application Templates and select the desired template from the list.
Creating an Account
An account must be created as part of the application process in CoPilot. An account can have one or more products and services assigned to it. You can create a new account in two different ways:
- Create an account for a new customer
Follow this process if a customer record does not yet exist in CoPilot for the account that is being created. - Create an account for an existing customer
In this scenario, a customer account already exists for the account that is being created. Following this process saves time since you can leverage existing customer data, expediting account creation.
Create an Account for a New Customer
To create an account for a new customer in CoPilot:
-
Click New Account in the top nav.
-
If you wish you use an existing application template, click the Account Template dropdown and select the desired template.
In this example, an existing application template was not selected in an effort to show you how to complete an application from scratch.
-
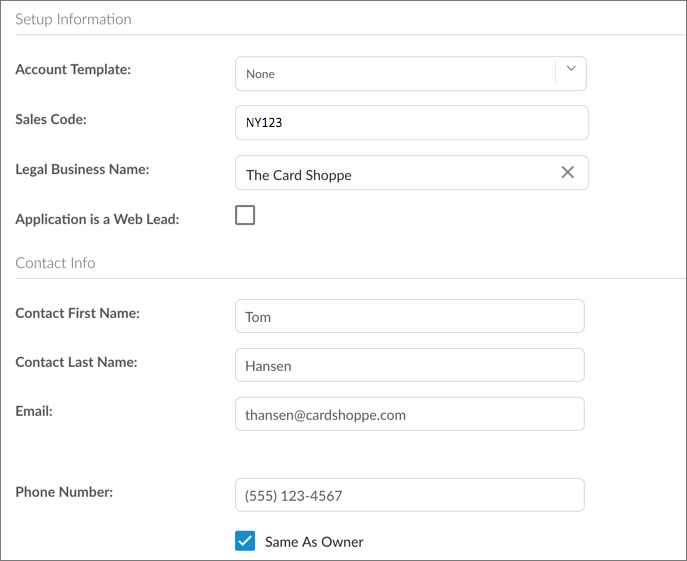
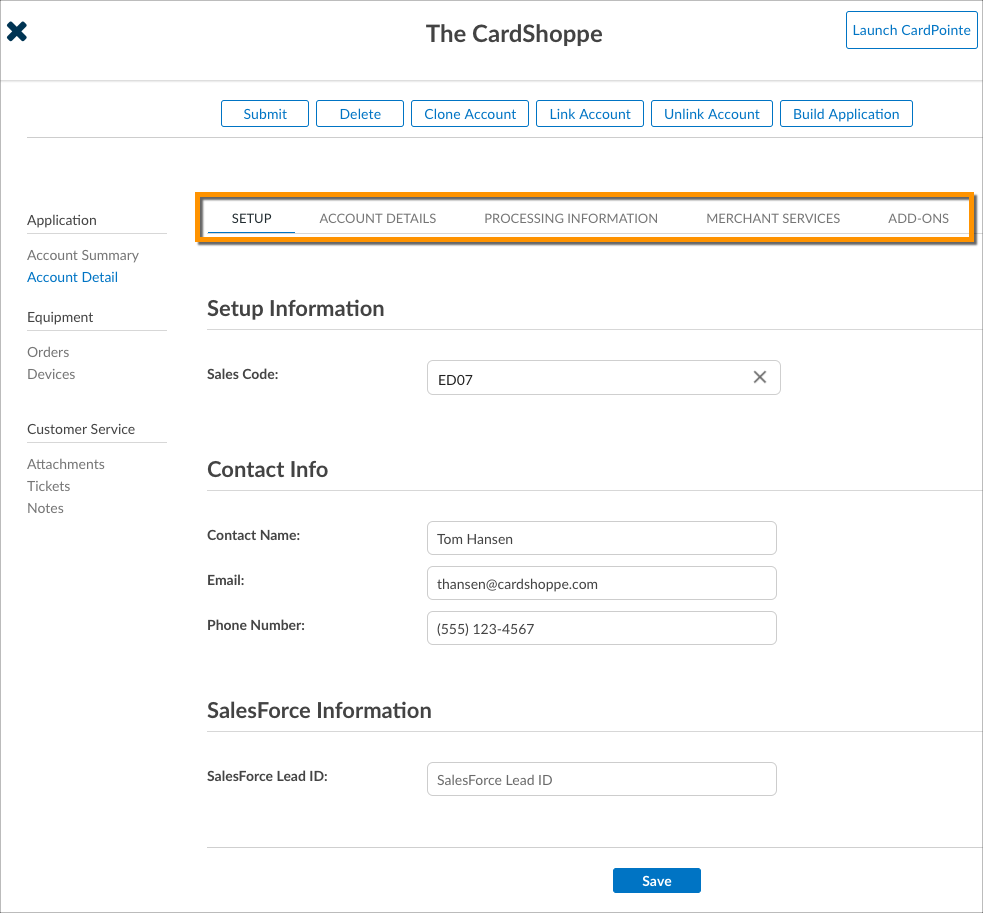
Click Save. The "Account Detail" screen displays with tabs that allow you input additional information about the merchant, including information related to their:
- Account Details
- Processing Information
- Merchant Services
- Add-Ons
-
Upon completing the information on these respective tabs, click Save.
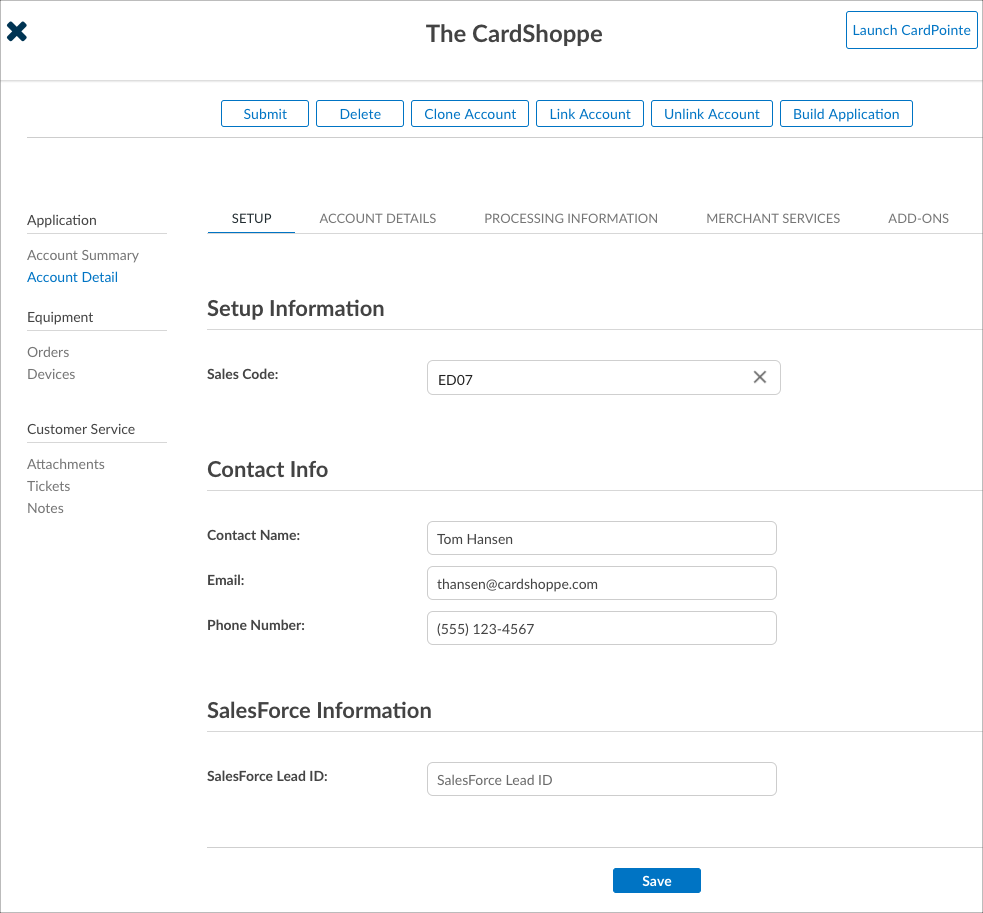
-
Now that you have added all of the necessary and supplemental information to the account, you are ready to send the application to the customer for review.
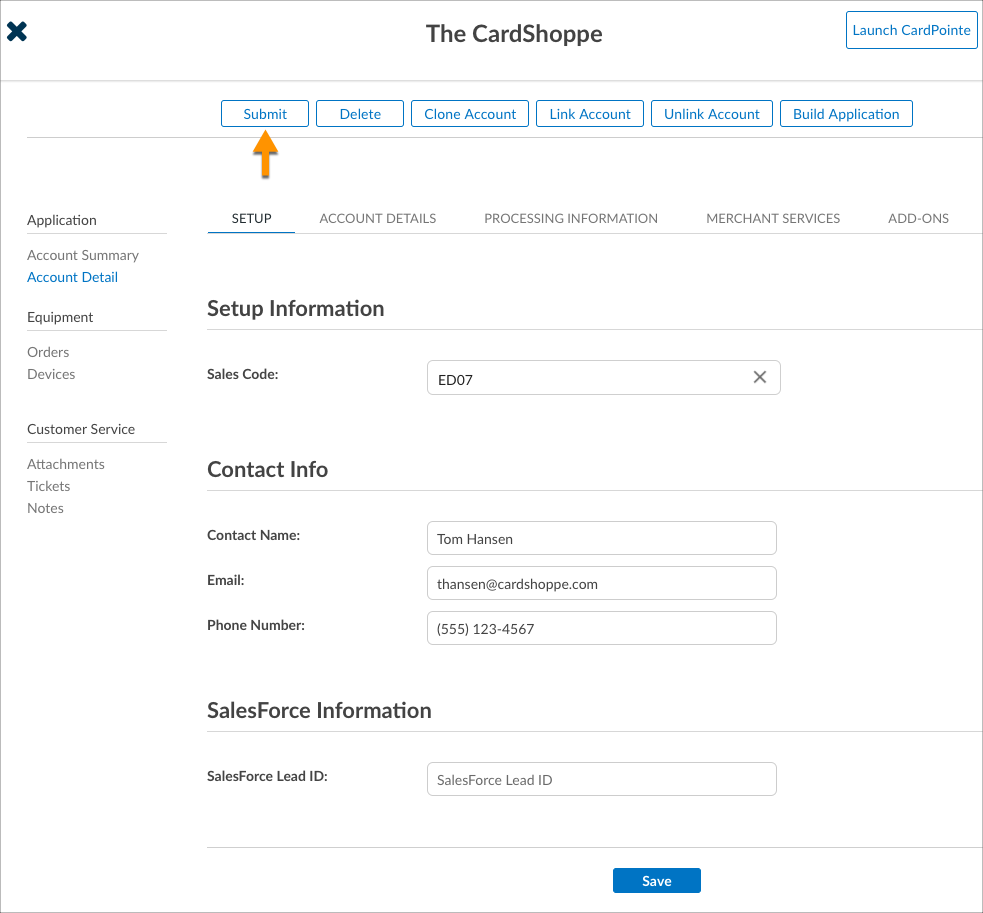
-
On the Account Detail screen, click Submit.
-
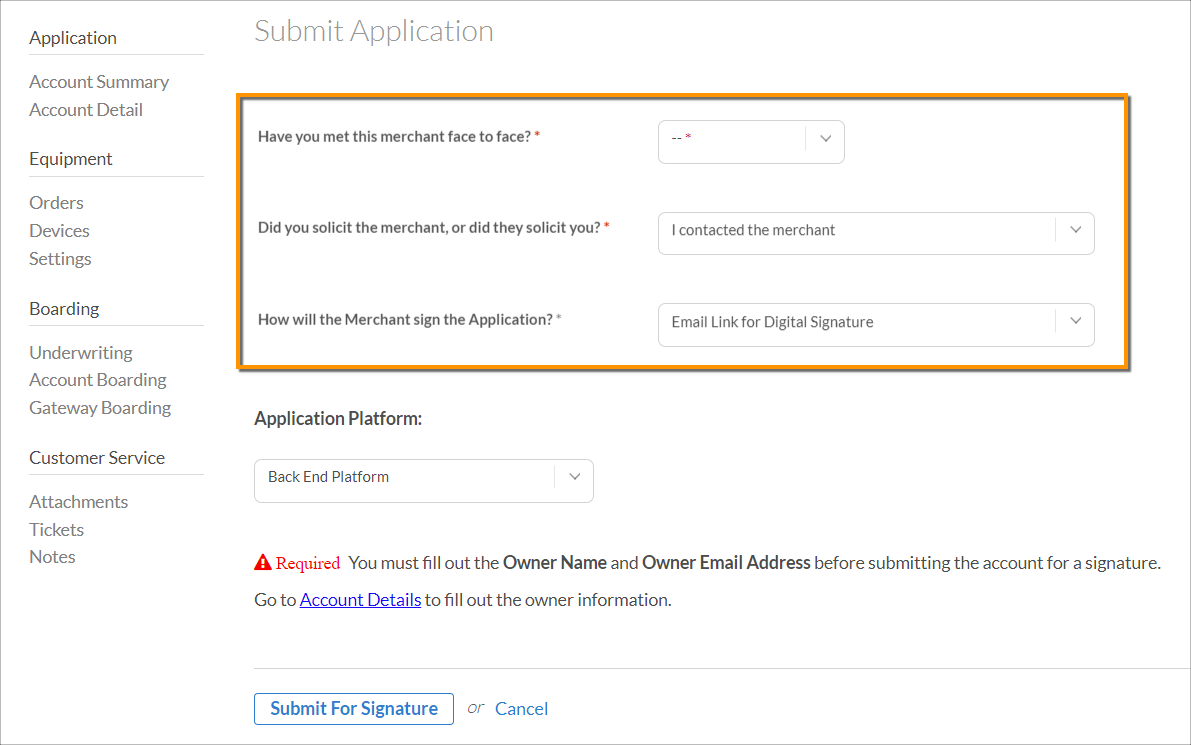
Before submitting an application in CoPilot, we need to capture some additional details about the merchant and how they'll be signing the application. You will now see the following questions prior to submitting the application for signature:
- Have you met this merchant face to face?
- Did you solicit the merchant, or did they solicit you?
- How will the merchant sign the application?
-
At the bottom of the screen within the Submit Application section, click Submit for Signature.
What's Next?
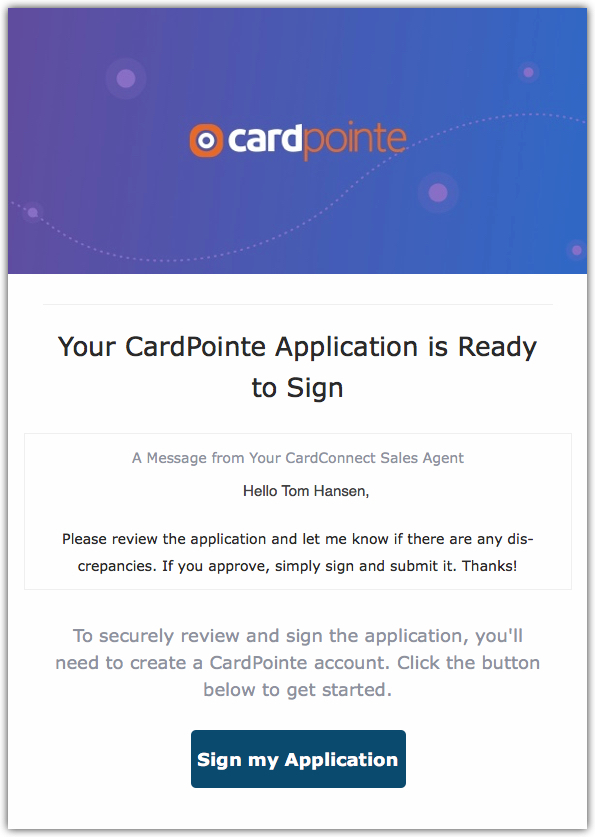
After submitting an account application for signature, the customer will receive an email at the email address that was provided in their account details. Please feel free to notify the customer that they can expect to receive an email from our team.
To help guide the customer through the application review process, refer to Guiding the Customer Through the Application Process.
Ordering Devices
To place an order for a device(s) for a customer:
-
Search for and select a customer. The "Account Summary" screen displays.
-
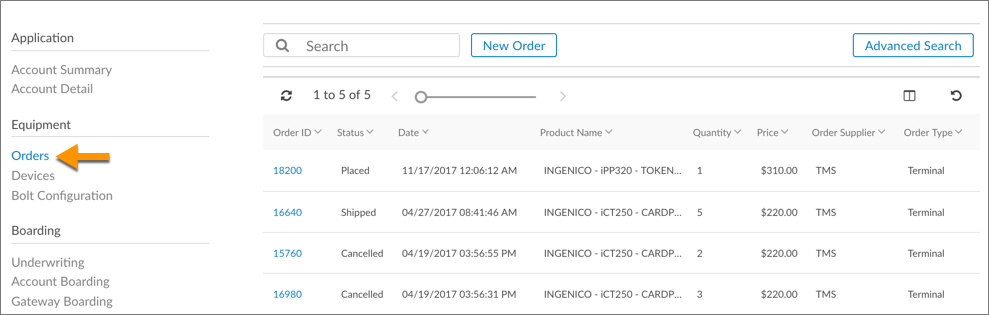
Click the Orders link in the left nav.
-
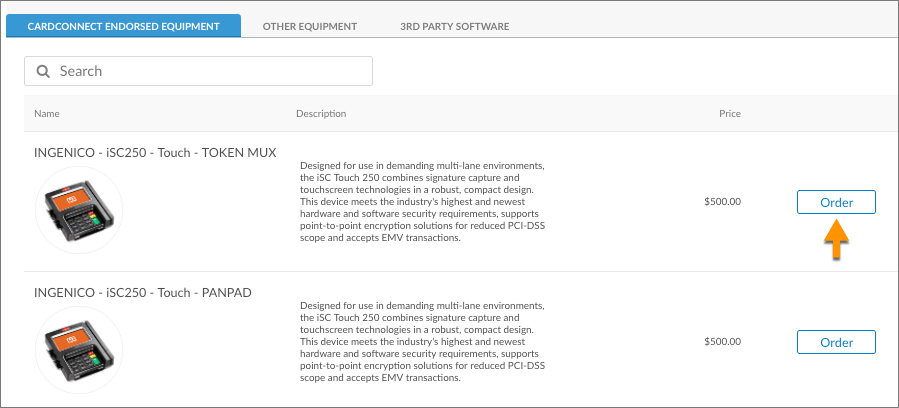
Click the New Order button. You are presented with three categories:
- CardPointe Endorsed Equipment
- Other Equipment
- 3rd Party Software
-
If you know the name of the device, you can search for it using the Search bar. You can also scroll through the devices to locate a device.
-
Click Order next to the device that you wish to order.
-
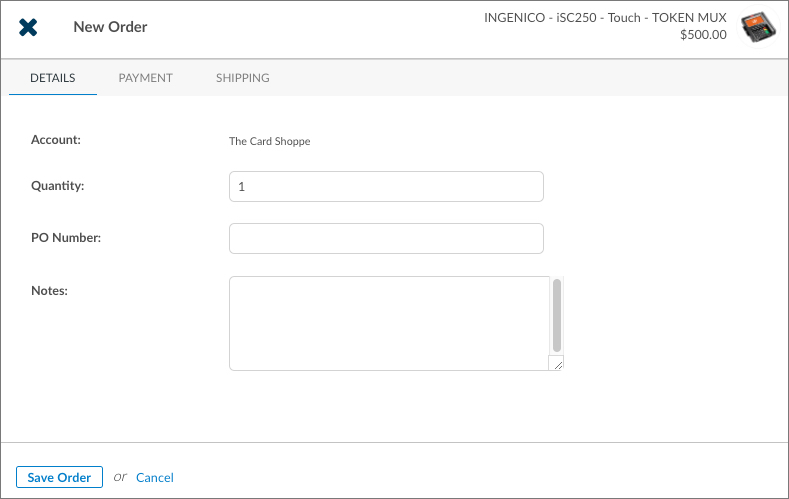
The "New Order" window displays.
Complete the information on the Details tab, and then proceed to the Payment tab.
-
On the "Payment" tab, choose how you'd like to be billed from the Billing Frequency and Bill To: drop-down menus.
-
On the "Shipping" tab, enter the shipping address for the order and choose the Shipping Method (Standard or Expedited).
-
When finished, click Save Order and then Submit All New Orders. The order is submitted to our teams for processing and an email is sent to the customer confirming the order.
For orders that have an Order Status of "Shipped," you can track the shipping status as follows:
-
Search for and select a customer. The "Account Summary" screen displays.
-
Click the Orders link in the left nav.
-
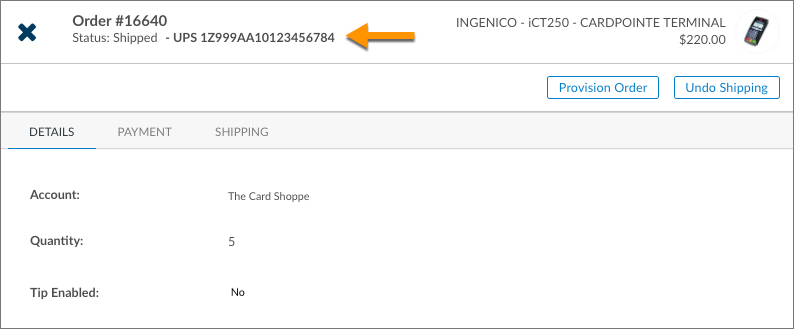
Locate the shipped order and click its Order ID.
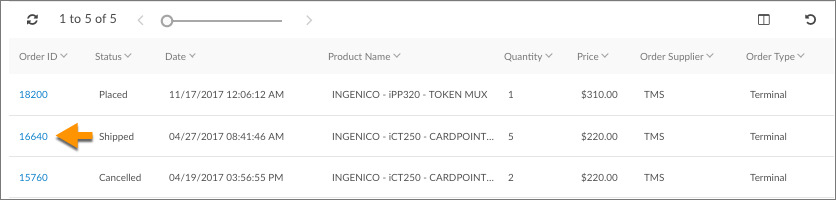
-
The order's tracking number displays at the top of the Order window.
To enter the details about a merchant's third-party device(s):
-
Search for and select a customer. The Account Summary screen displays.
-
Click Edit to display the Edit Account screen.

-
Select the Equipment tab.
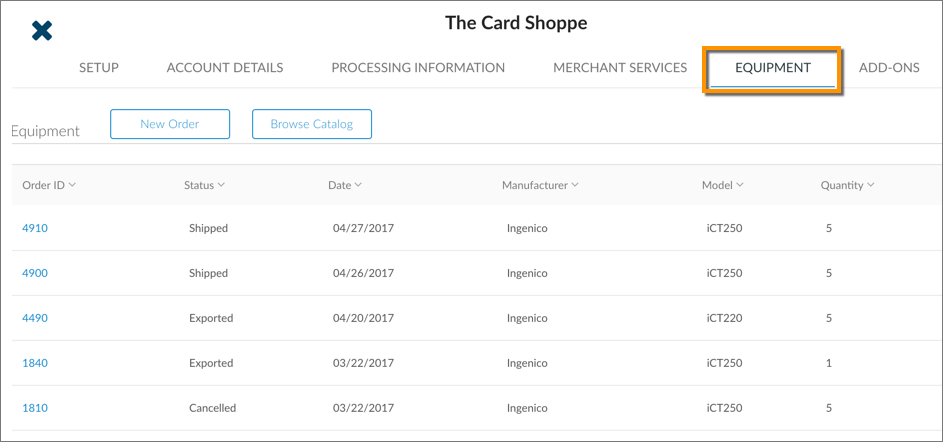
-
Locate the Already Owned Equipment section of the screen and click Add.
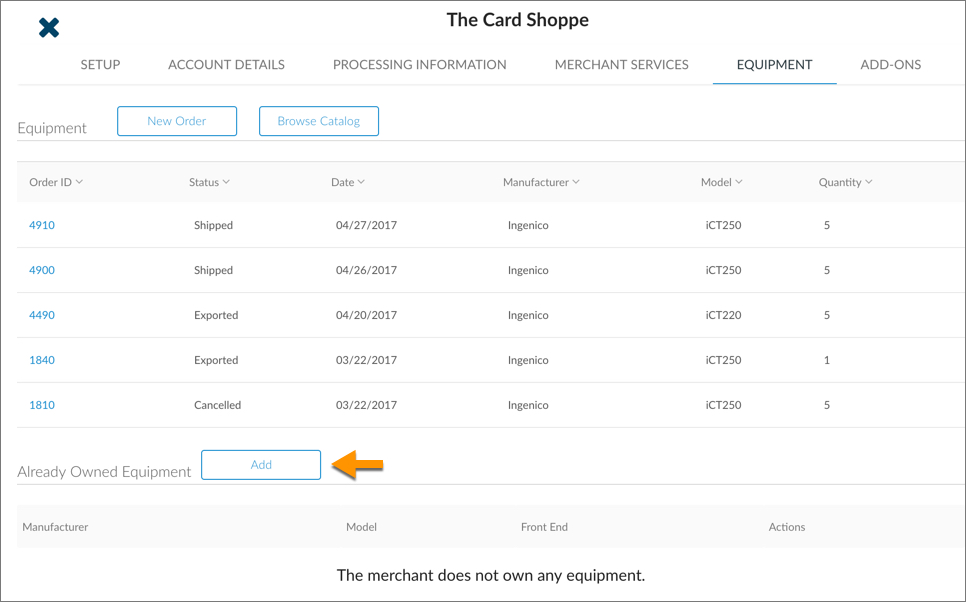
-
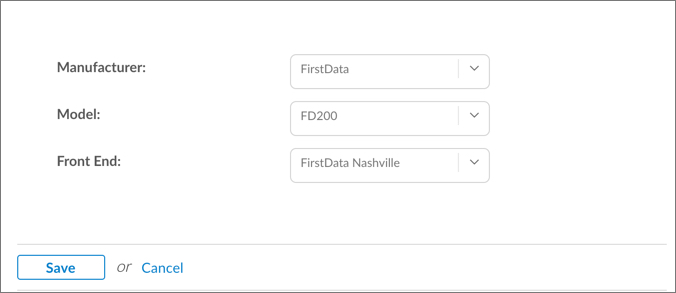
Select the device manufacturer, model, and front end processor from the drop-downs, and click Save.

-
The Already Owned Equipment table updates with the information that you provided about the merchant's existing device.

To enter the details about a merchant's third-party device(s):
-
Search for and select a customer. The Account Summary screen displays.
-
Click Edit to display the Edit Account screen.

-
Select the Equipment tab.

-
Locate the Already Owned Equipment section of the screen and click Add.

-
Select the device manufacturer, model, and front end processor from the drop-downs, and click Save.
-
The Already Owned Equipment table updates with the information that you provided about the merchant's existing device.

Managing Procured Devices
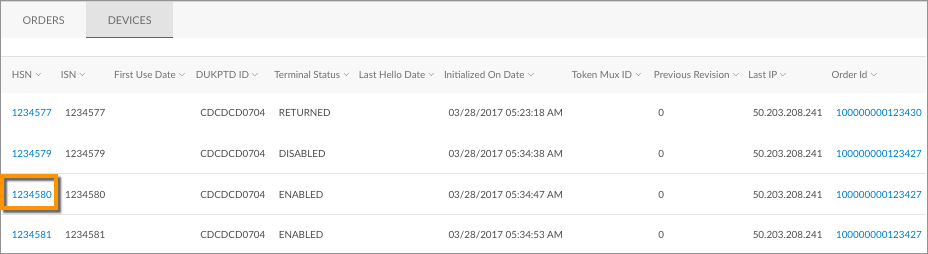
You can manage an account's procured devices on the Equipment > Devices sub-tab.
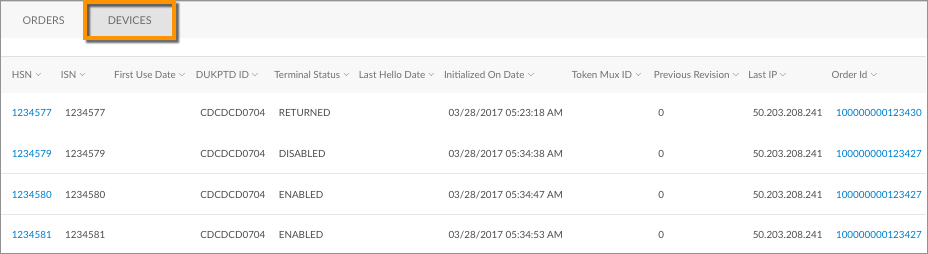
From this screen, you can enable (activate) a device, disable a device, and return a device.
Enabling a Device
To activate a procured device:
-
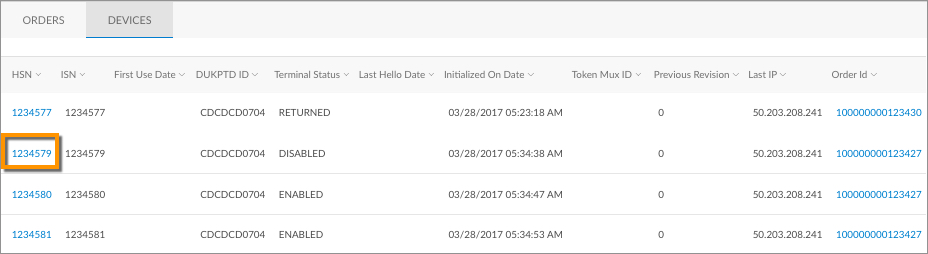
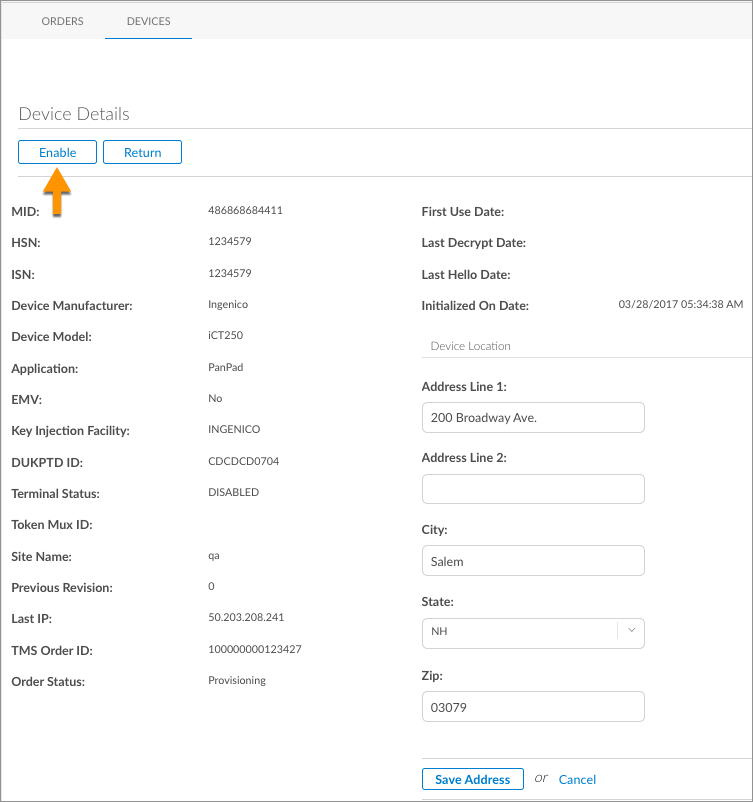
Click the link in the HSN column to display the "Device Details" screen.
-
Click Enable to activate the device.
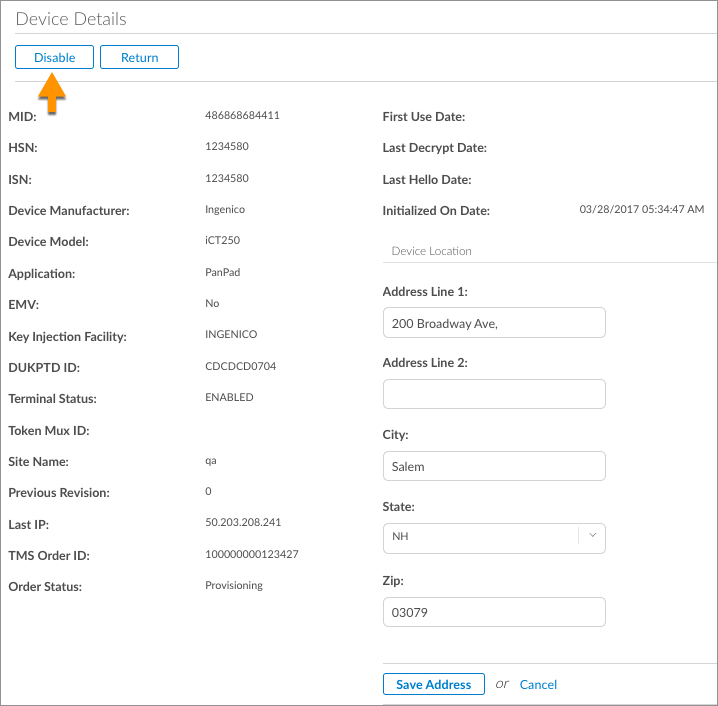
To disable a procured device:
-
Click the link in the HSN column to display the "Device Details" screen.
-
Click Disable to disable the device.
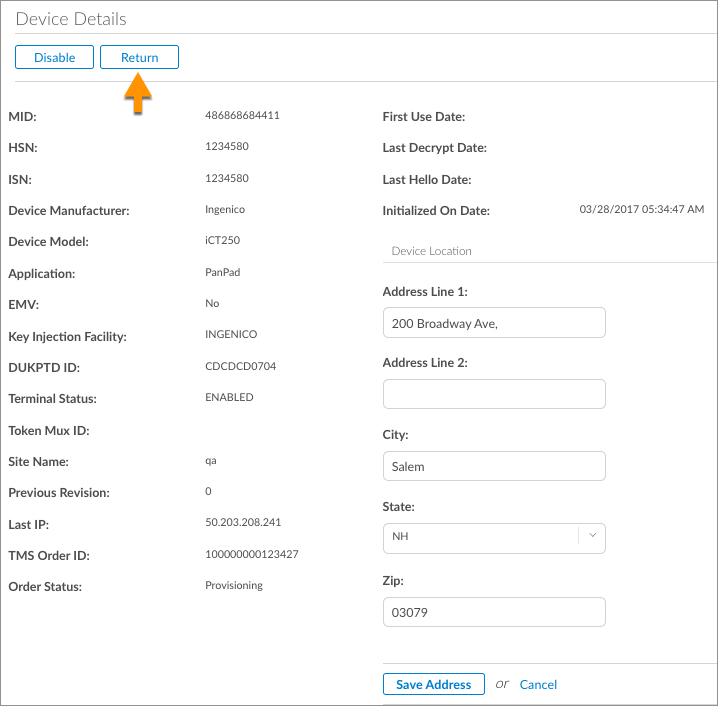
To initiate a return on a device:
-
Click the link in the HSN column to display the "Device Details" screen.

-
Click Return to initiate a device return.
Adding Features and Services
You can add various CardPointe features and other services to a merchant's account from the Add-Ons tab on the Edit screen.
The following features and services can be added to an account:
| CardPointe Features | Additional Services |
|
|
Add Features and Services to an Account
To add a CardPointe feature or other services to an account:
-
Search for and select a customer. The Account Summary screen displays.
-
Click Edit to display the Edit Account screen.
-
Select the Add-Ons tab.
-
Click Add.
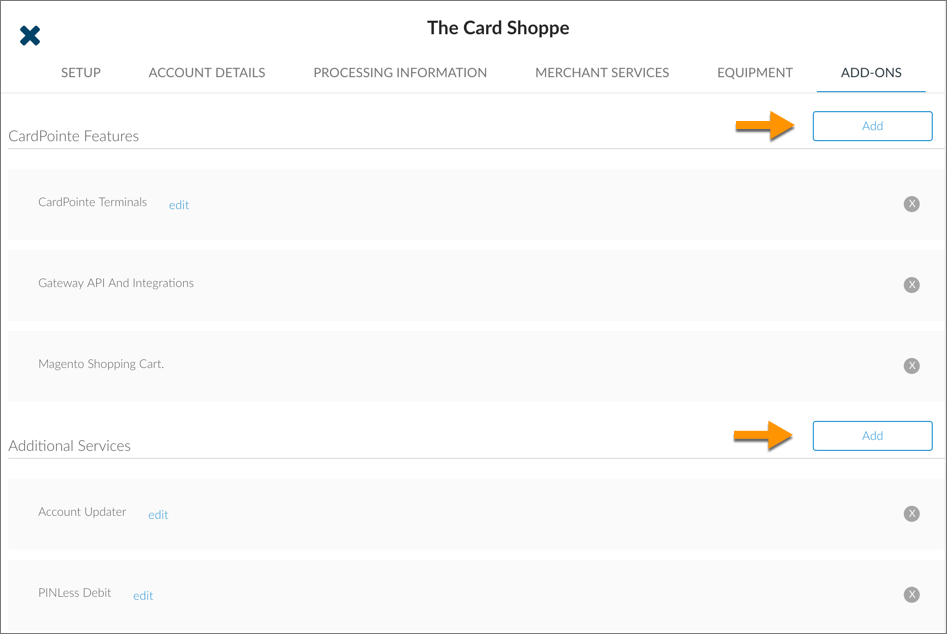
-
Click Add next to each feature and/or service that you wish to add to the account.
-
When finished, click Apply.
A CardPointe support representative will review the request and will contact you via the CoPilot ticket with the next steps. You can review the CardPointe Features and Additional Services associated with the account from the customer's Account Details screen.
-
The customer must click the Sign my Application link in the email that was sent by CardPointe.
-
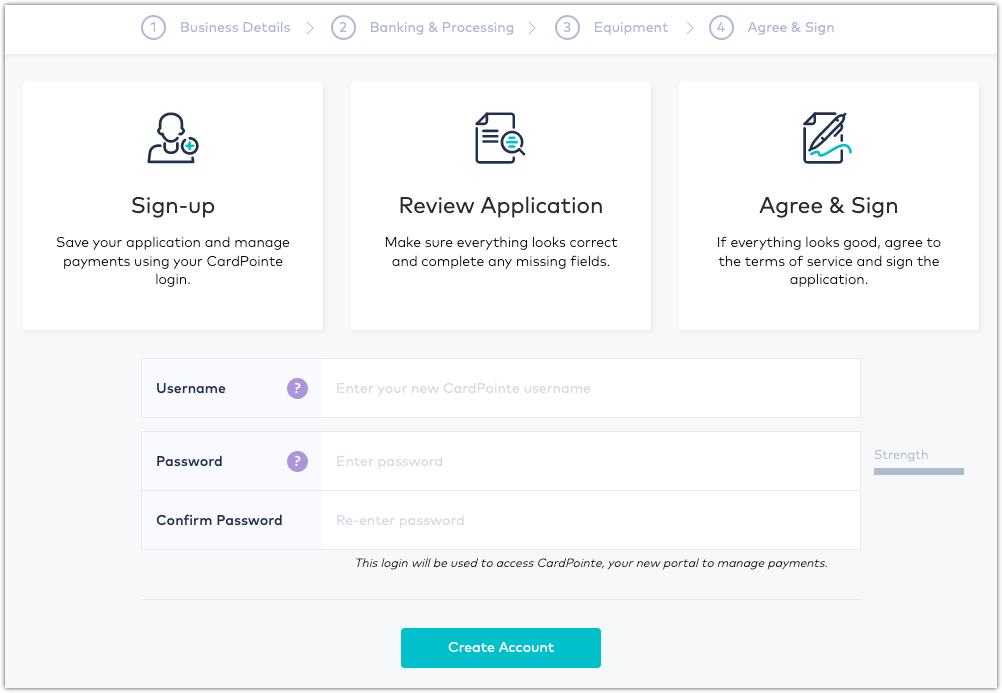
The customer chooses a username and password to create their CardPointe account, and clicks Create Account.
-
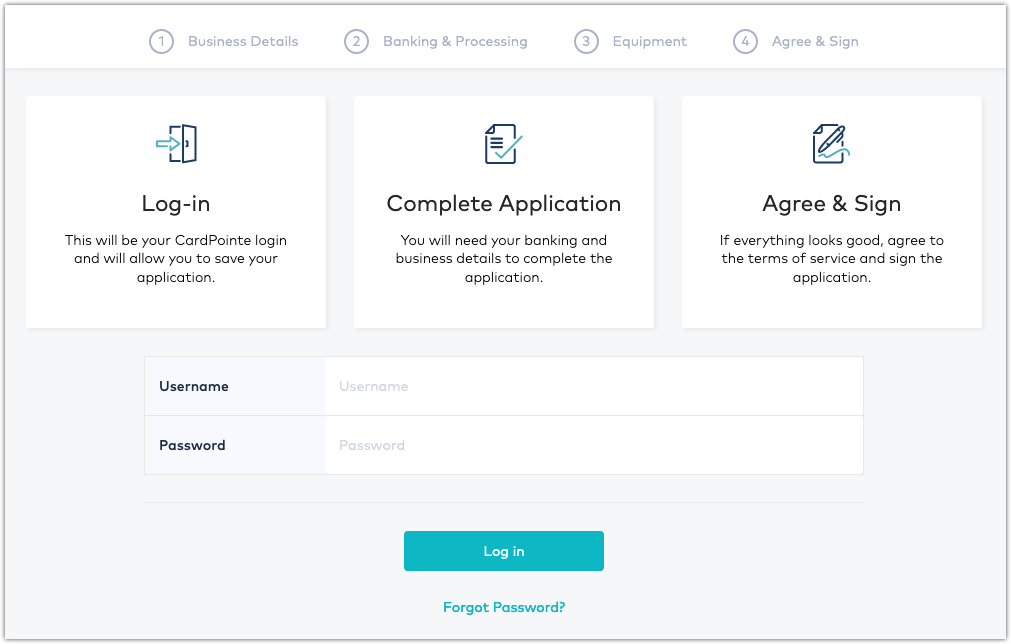
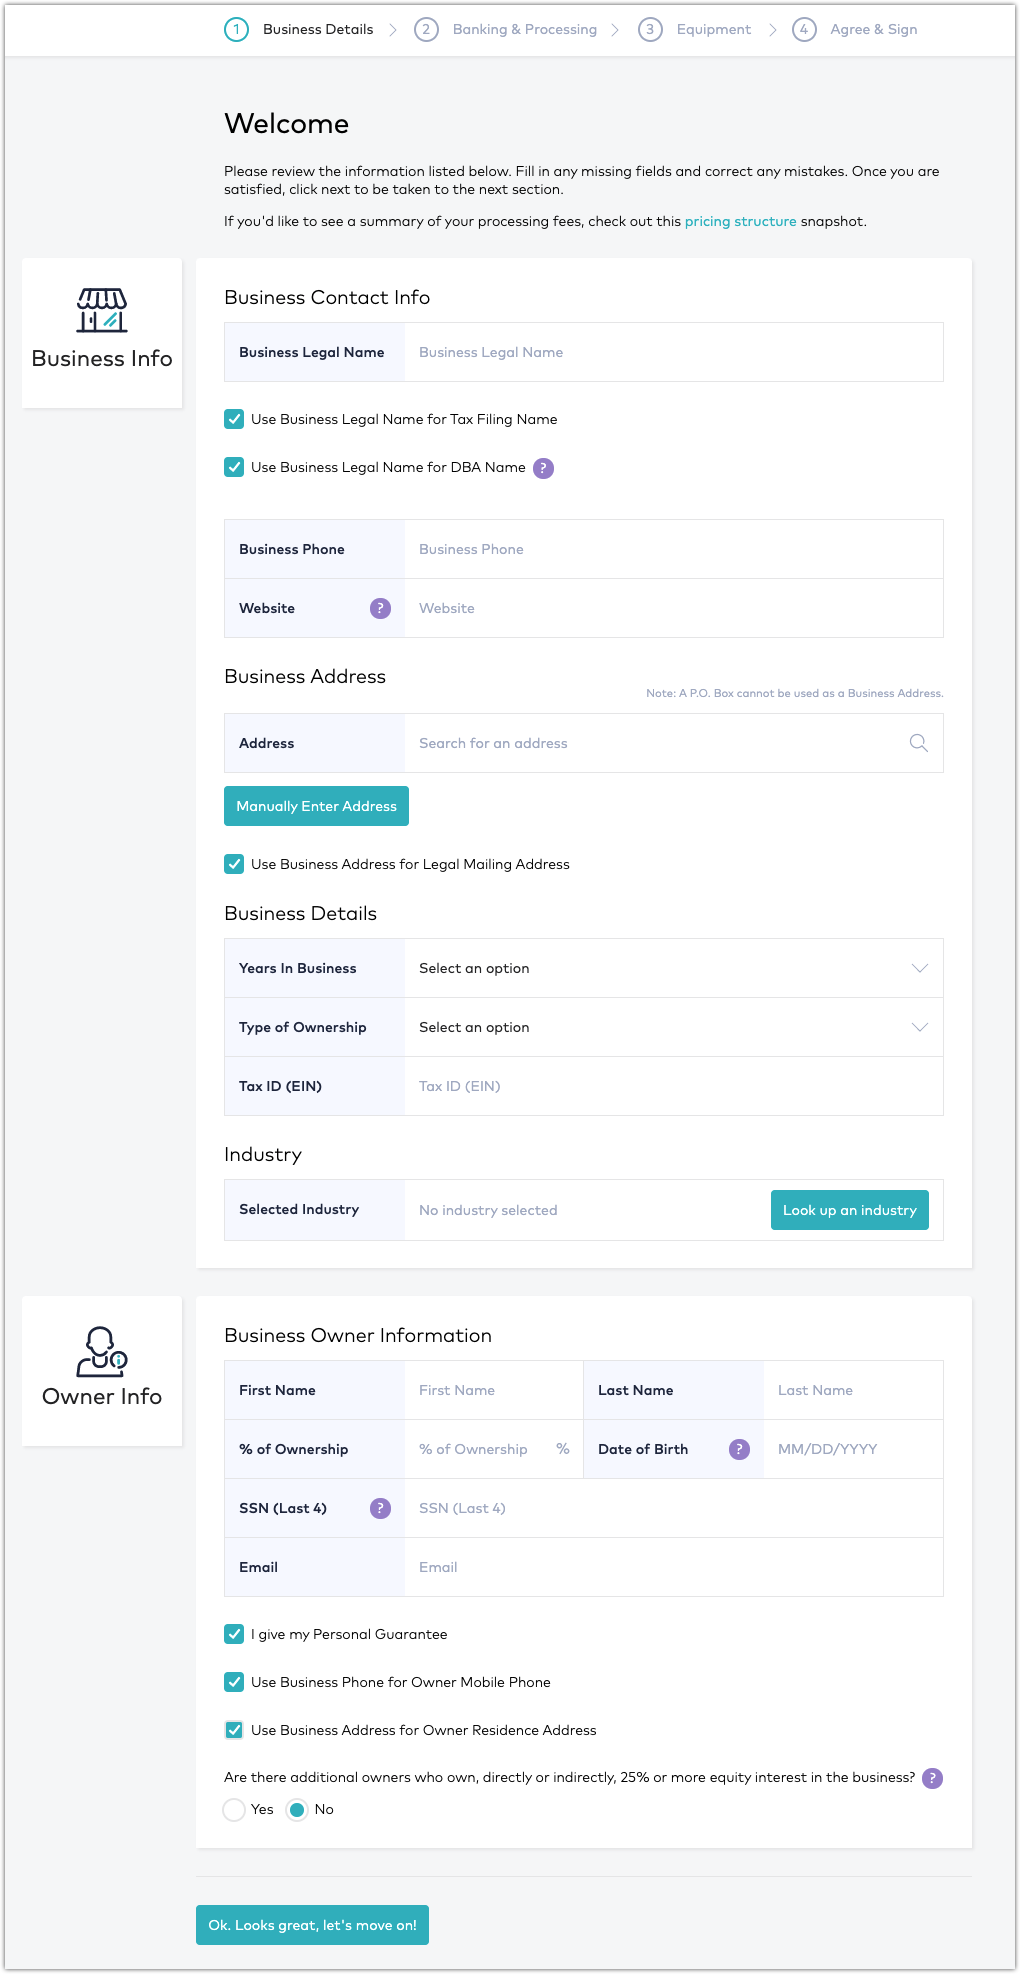
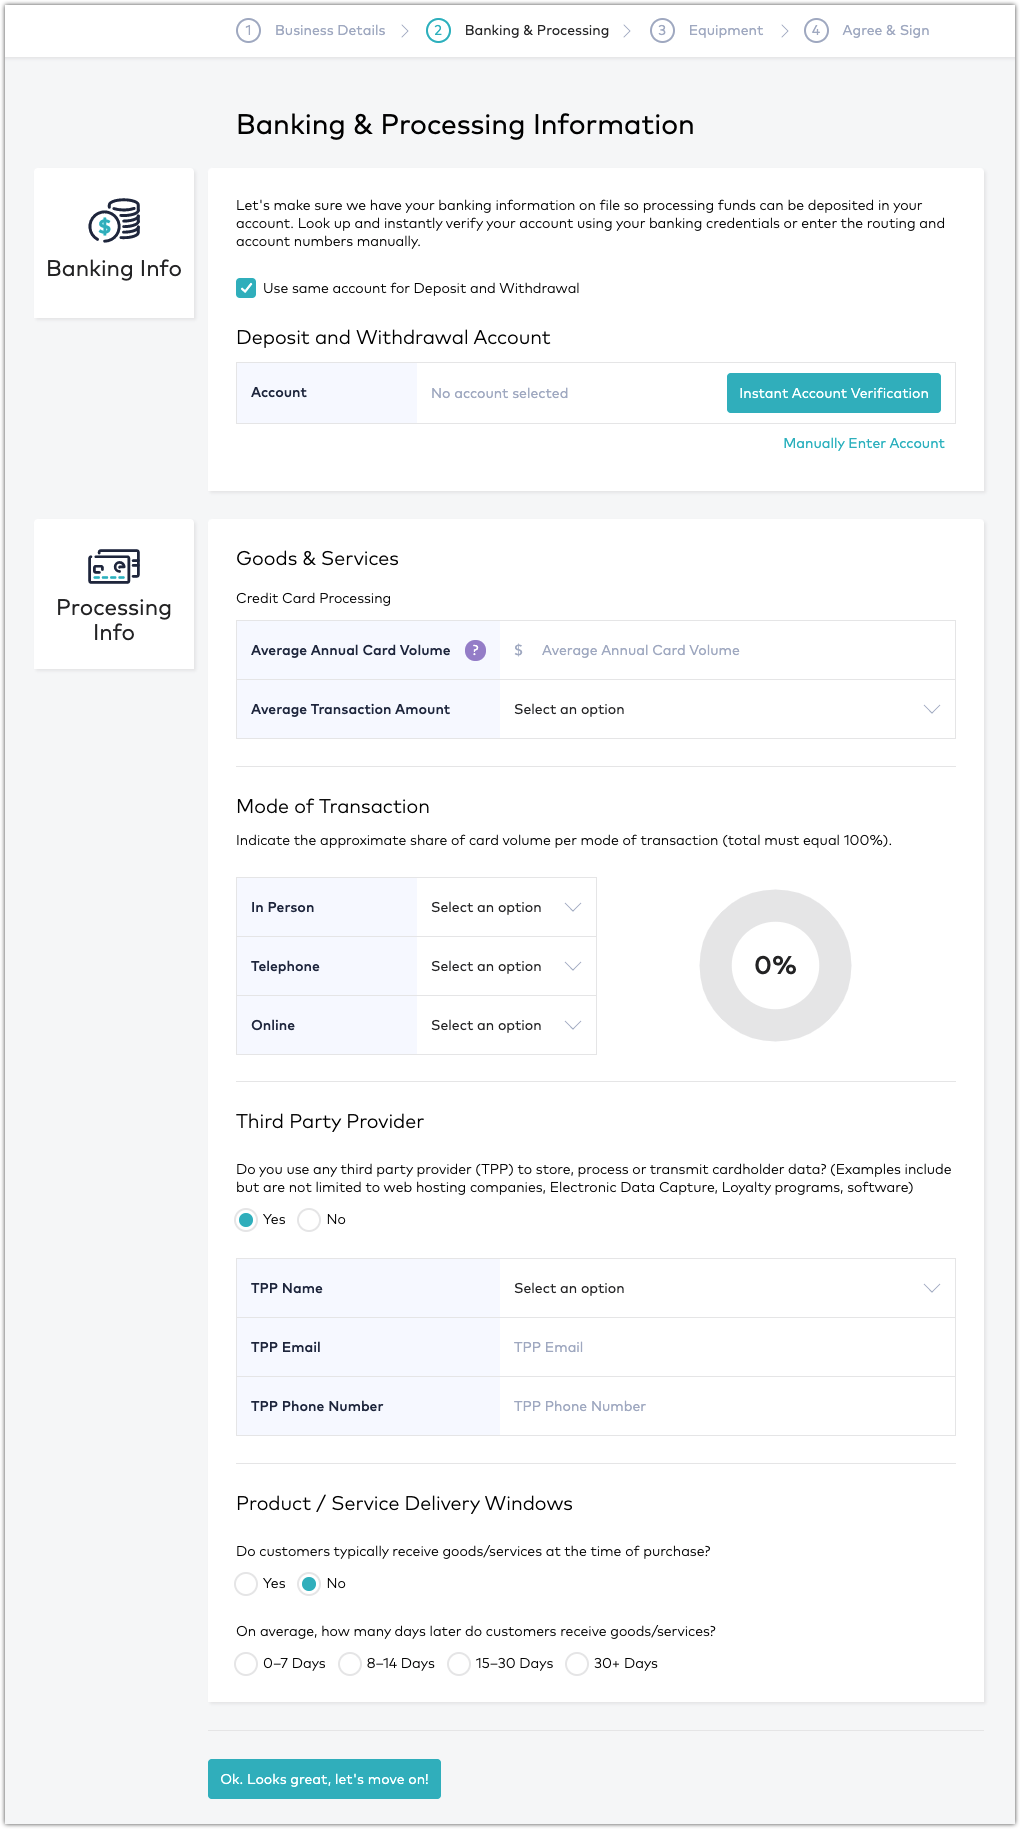
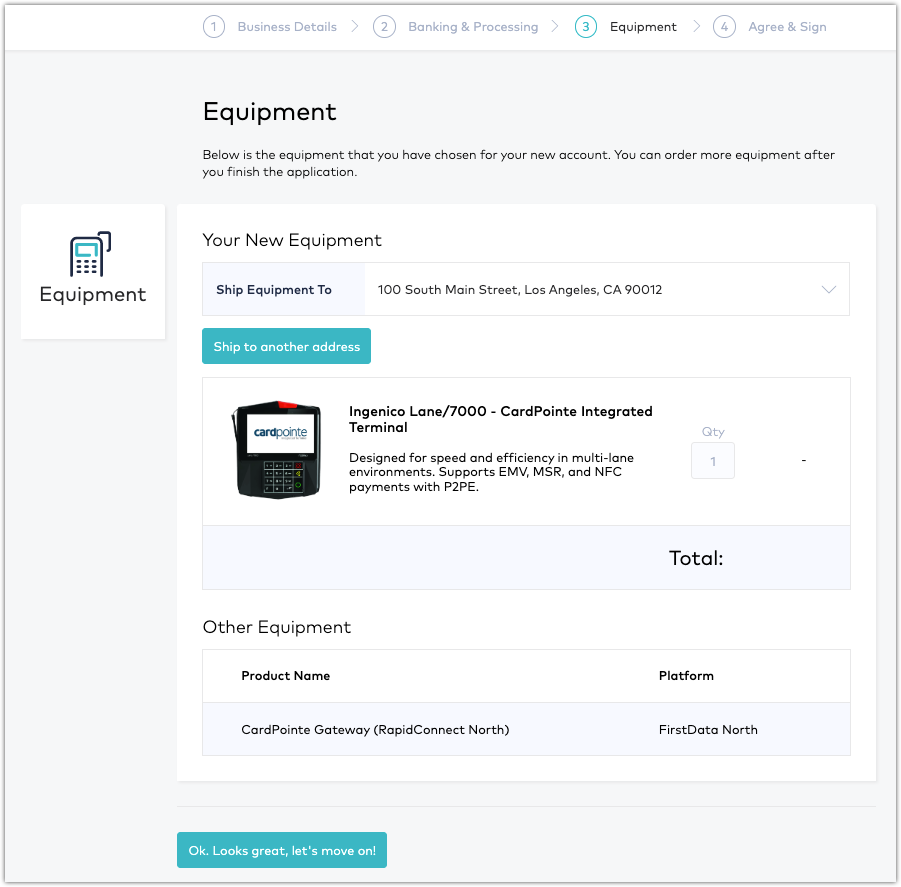
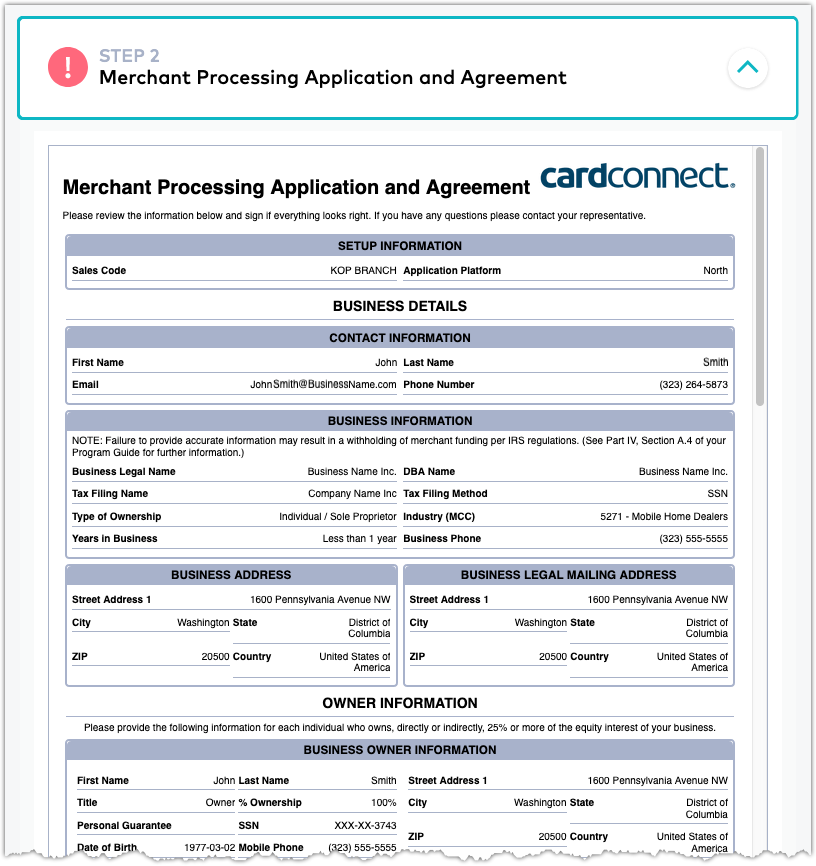
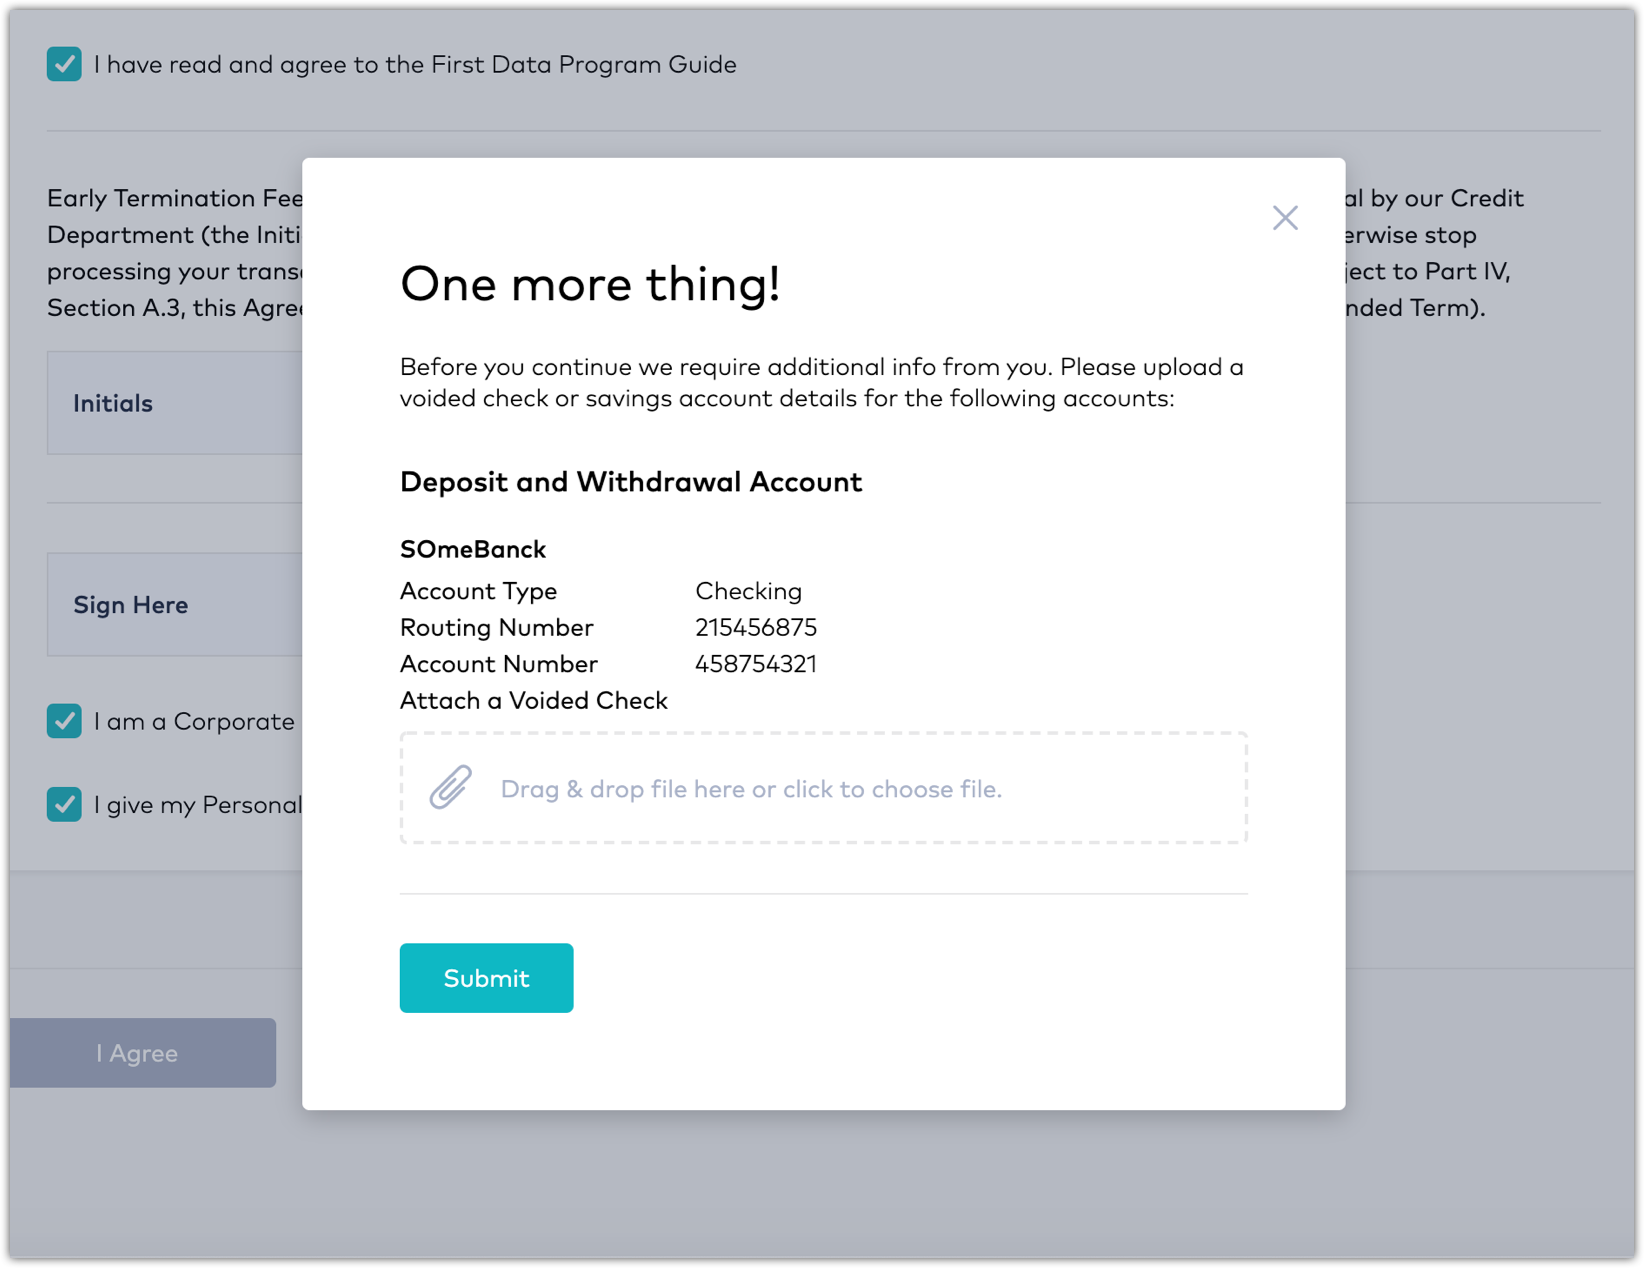
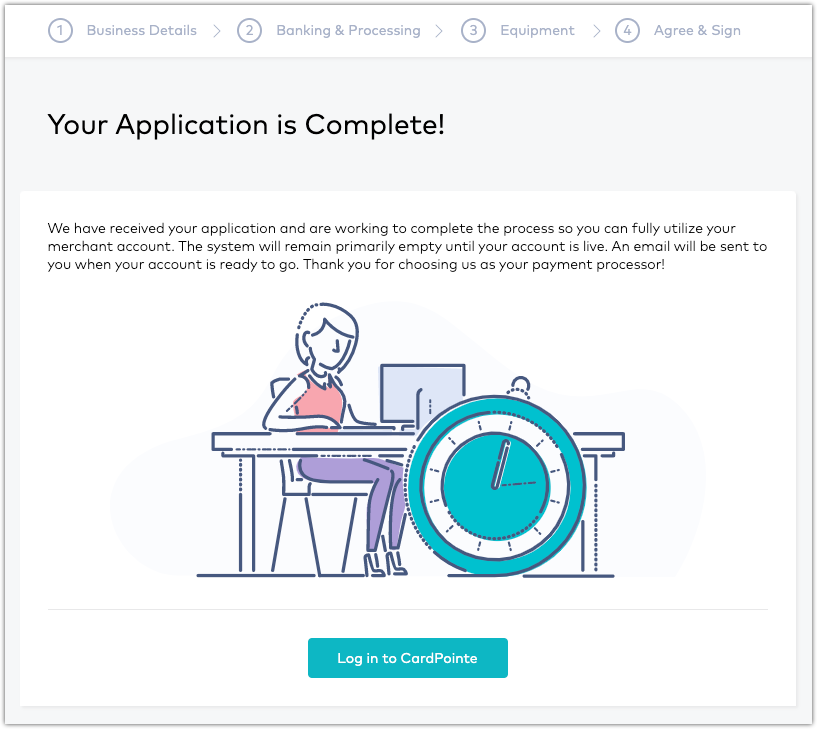
The customer then signs in using their newly created CardPointe account and the online application guides them through each of the pages to enter or review the necessary information.
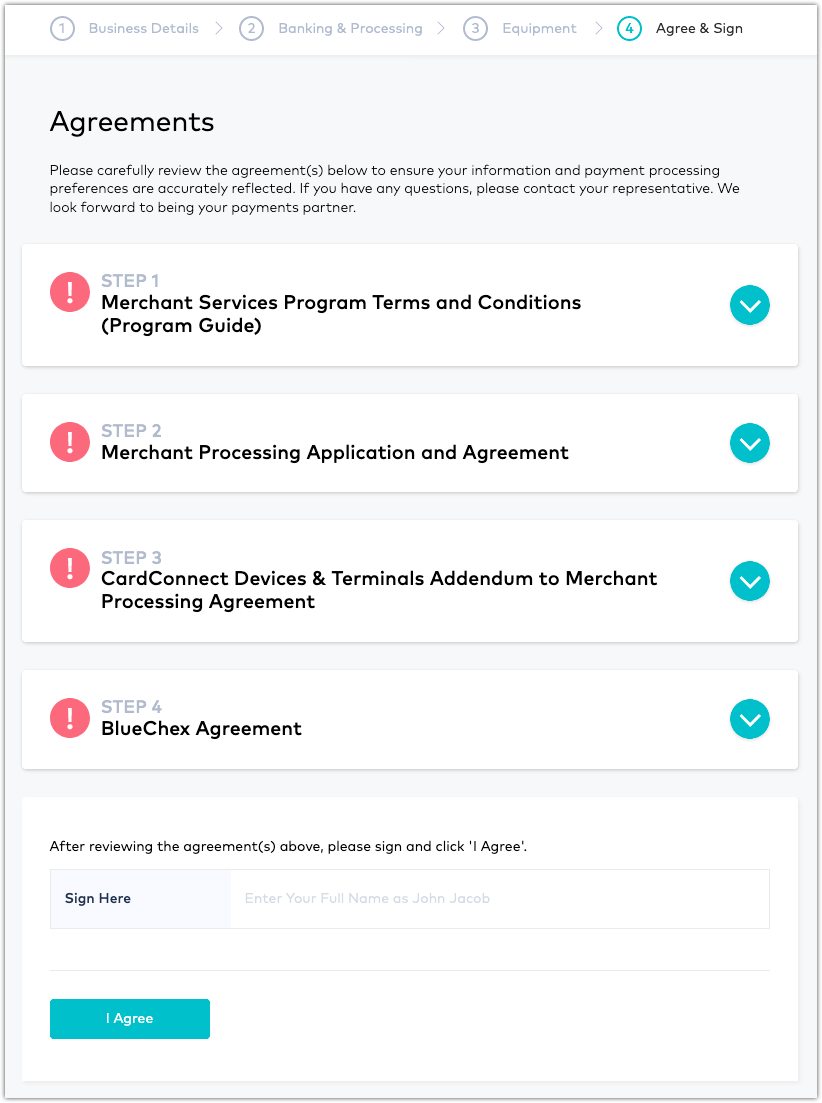
View the Online Application Sample below for reference. -
Upon completion, the customer must agree to the terms and digitally sign the application. The application is then forwarded to Underwriting for review.
Cloning Account Information
When adding a new account for an existing customer, you can save time by reusing account details from the customer's existing merchant account(s).
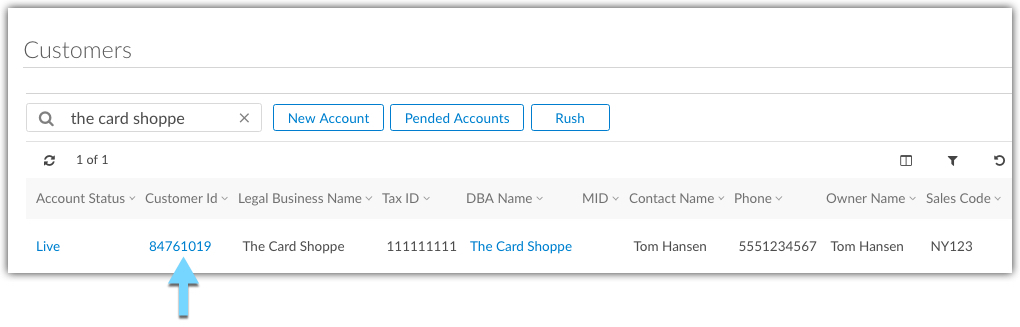
For instance, the customer in this example - Tom Hansen - has an existing merchant account in CoPilot named "The Card Shoppe." He now wishes to apply for a new merchant account for one of his other business locations. Since these business are similar, we recommend cloning the existing account, rather than starting from scratch to create a new account. Cloning an account copies the following account-related information into a new merchant account:
- Account Details
- Setup Information
- Processing Information
- Product Configurations
You can clone an existing customer account in two ways:
Clone an Existing Account During Account Creation
-
Click Customers in the left nav.
-
Search for and select the desired Customer ID.
-
Click the Accounts sub-tab.
-
Click Add Account.

-
From the Create Account screen, click Clone Primary.
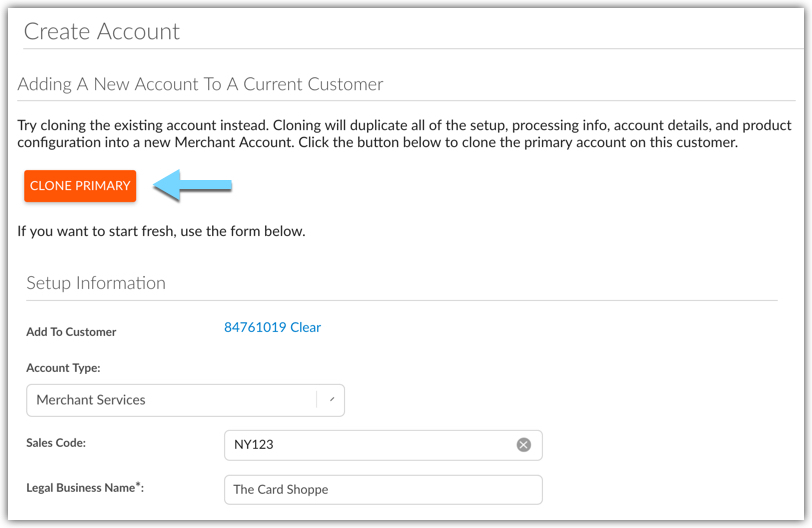
The existing account information is copied into a new account, allowing you to continue to create the account.
Note: After cloning an account, see Creating an Account for information on submitting the account.
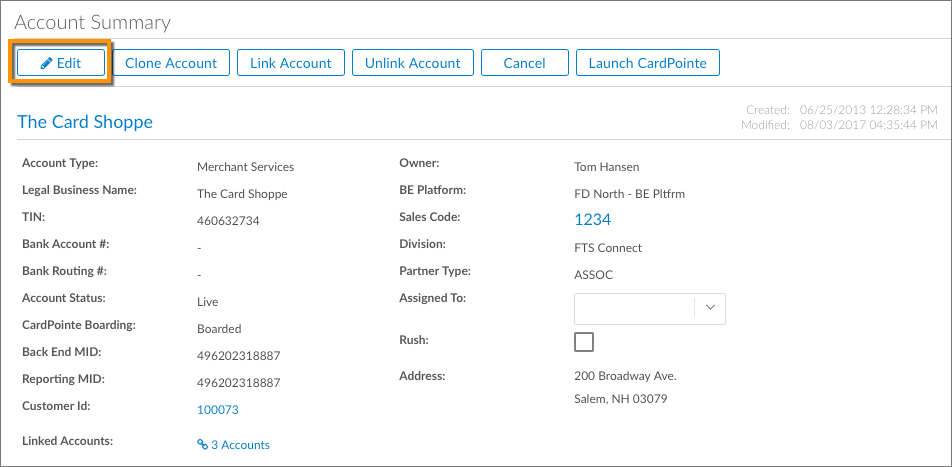
Clone an Existing Account from the Account Summary Screen
-
Click Customers in left nav.
-
Search for the customer and either click the status of the account under the Account Status column, or click the name of the account under the DBA Name column.

-
Click Clone Account.
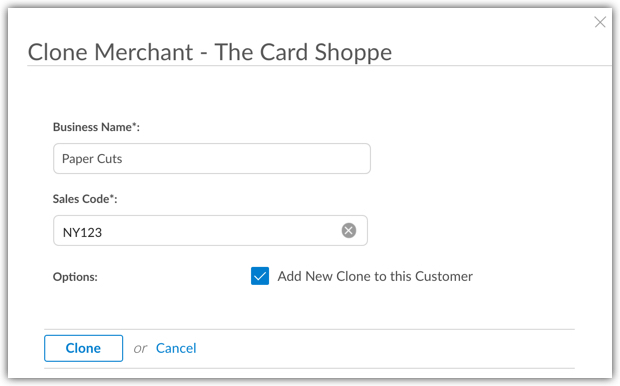
-
Enter the name of the new account in the Business Name field.
-
Click Clone. The existing account information is copied into a new account, allowing you to continue to create the account.
Please note that if you just wish to copy an existing account and you do not want the newly cloned account to be linked to the existing account, simply uncheck the Add New Clone to this Customer box.
Note: After cloning an account, see Creating an Account for information on submitting the account.
Residuals
CoPilot provides transparent, line-by-line residual reports that are always available to you within the application. The level of detail in the residual reports provides the assurance that you need to trust that you are being paid accurately. CoPilot calculates the residuals for your sub-agents and provide line item details for your individual teams.
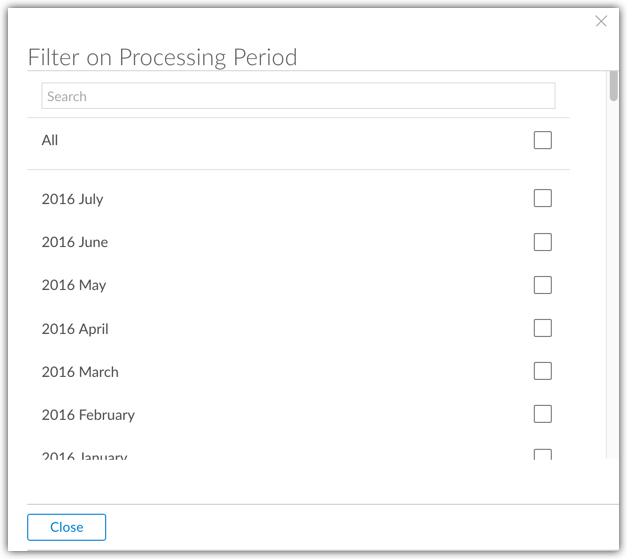
To access your residuals, click Residuals in the left nav. You can search for residuals by month by clicking Processing Period and checking the box next to each month that you wish to view.
Note: The ability to view residuals is based on your user role in CoPilot. Refer to Managing CoPilot Users for more information.
Support Tickets
CoPilot's support ticket system allows you to communicate directly with our dedicated in-house support teams. Each CoPilot ticket corresponds to a specific operations department to ensure you receive the proper assistance from the appropriate team.
You can create the following types of support tickets in CoPilot:
- Account Tickets
Account support tickets should be used when you have questions or requests that relate to a specific Account/MID. - Partner Tickets
Partner support tickets should be used when you have questions or requests related to your business, as well as for other non-MID related inquiries.
Submitting an Account Support Ticket
To submit a question or inquiry related to a specific Account/MID
-
Click Create Ticket at the top-right of CoPilot.

-
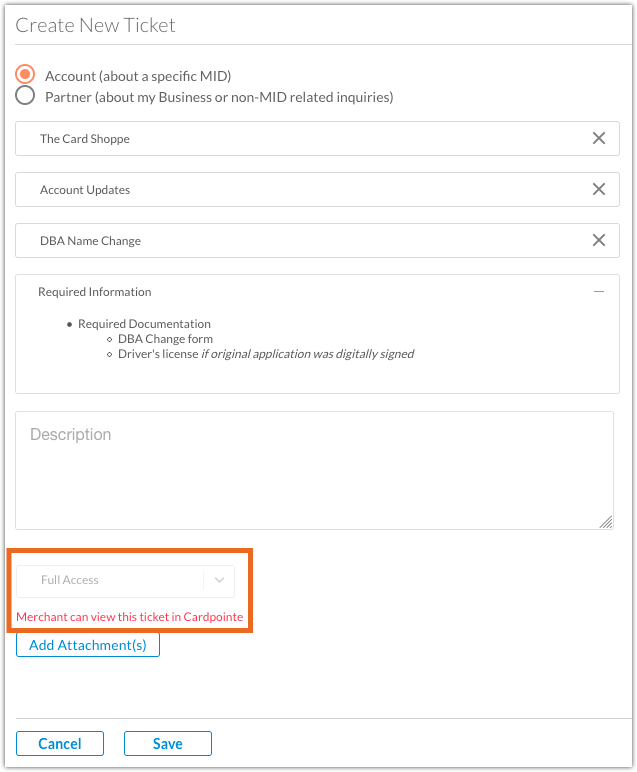
Ensure that the Account radio button is selected.
-
Click the Account field and choose the account that the support ticket applies to.
-
Click the What type of ticket are you looking for? field and choose the type of support request that you'd like to open.
-
Click the Reason field and choose a reason for the ticket.
-
Enter a Description for your request.
-
Take note of the Merchant Access Level. Depending of the type of ticket, the merchant is given Full Access, Status Updates Only, or No Access.
-
If you have file attachments to upload, click Add Attachments and upload them to the ticket.
-
When finished, click Save. A member of our support staff will respond as soon as possible.
Submitting a Partner Support Ticket
To submit a question or inquiry related to your business:
-
Click Create Ticket at the top-right of CoPilot.

-
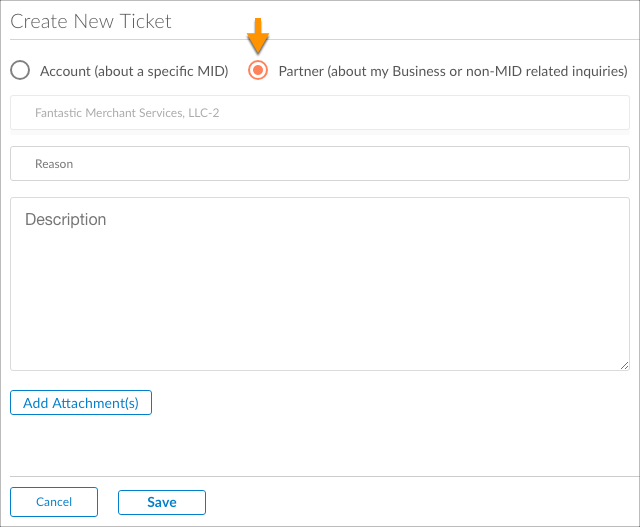
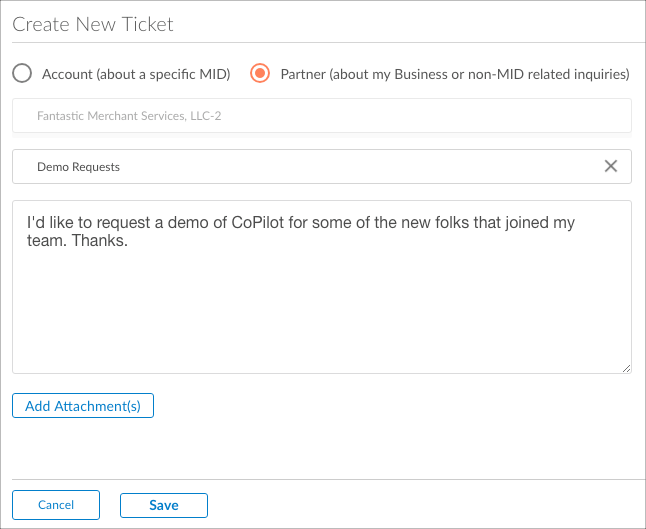
Click the Partner radio button.
-
Click the Reason field to select from the list of ticket reasons.
-
Enter a description for your request.
-
If you have file attachments to upload, click Add Attachments and upload them to the ticket.
-
When finished, click Save. A member of our support staff will respond as soon as possible.
Ticket Categories
We have categorized each ticket type according to the following operations departments:
- Merchant Solutions
- Partner Solutions
- CardPointe Support
- Boarding
- Risk Management/Underwriting
- Collections and Retention
Merchant Solutions
| Ticket Reason | Description |
|---|---|
| Authorization/Full Card Number Request | Requests for full credit card data or authorization logs |
| Bank Account Change | Requests to update a merchant ABA/DDA |
| Datawire/Apriva Request | Requests to send Hosted Payment Page welcome email or any inquiry related to HPP integrations |
| Demographic Change | Support requests for all gateway API/integration questions, concerns or issues |
| Deposit/Transaction Assistance | Requests to research merchant transactions, batches or daily deposits |
| Entitlement Update | Requests to add or remove card types |
| Legal/Tax ID or DBA Name Change | Requests to update legal business name, DBA name and/or federal tax id |
| PCI Question | Requests related to merchant PCI Compliance status or billing |
| PIN Debit Chargeback | Used for the submission of PIN Debit chargeback documentation |
| Pricing Update | Requests to increase or decrease merchant level pricing |
| Research Request | Request to research a merchant account, funding or miscellaneous issues |
| Seasonal Account Activation/Deactivation | Requests to close or re-open seasonal merchants |
| Statement/Reporting Assistance | Requests related to merchant statements or billing inquiries |
Partner Solutions
| Ticket Reason | Description |
|---|---|
| 3rd Party Equipment/VAR/Supplies | Request for new equipment, file builds and VAR sheets for existing merchant third party solutions |
| Residual Questions | Questions related to partner residuals |
CardPointe Support
| Ticket Reason | Description |
|---|---|
| CardPointe Equipment Return Request | Requests to return CardPointe-related equipment |
| CardPointe Gateway Activation/Setup | Requests to activate the CardPointe Gateway or any setup under the CardPointe Product Suite |
| CardPointe Gateway Only Setup | Requests to setup gateway-only/non-acquiring deals on the CardPointe Gateway |
| CardPointe Mobile Setup | Requests to activate CardPointe Mobile or send CardPointe Mobile welcome email |
| CardPointe Password/Registration Request | Requests to reset a CardPointe Password, add users or send registration email |
| CardPointe PAN Pad/Integrated Device Order | Requests for integrated a PAN Pad/integrated device working through the CardPointe Gateway |
| CardPointe Terminal/ Equipment Order | Requests for the CardPointe Terminal, CardPointe Mobile device, USB wedge or any other CardPointe-related device |
| CardPointe Terminal/Gateway Support | Support request for all CardPointe-related questions, concerns or issues |
| Hosted Payment Page Inquiry | Requests to send a Hosted Payment Page welcome email or any inquiry related to HPP integrations |
| Integration/API Support | Support requests for all gateway API/integration questions, concerns or issues |
Boarding
| Ticket Reason | Description |
|---|---|
| Boarding | Requests related to new merchant boarding, including setup instructions, terminal downloads, clover equipment or provisioning and tokenization/encryption setups for third party solutions |
| CardPointe Terminal Platform Change | Requests to convert Omaha customers to North for use of the CardPointe Terminal |
Risk Management/Underwriting
| Ticket Reason | Description |
|---|---|
| Risk Management (Underwriting) | Questions related to Risk Management, including open risk reviews, large transaction notifications, PTS rejects, volume increase requests, etc. |
| Underwriting | Requests or notifications related to new merchant Underwriting |
| Underwriting (ACH ProfitStars Setup) | Requests or notifications related to the setup or maintenance of ACH (ProfitStars) customers |
Collections and Retention
| New Ticket Reason | Description |
|---|---|
| Account Reactivation | Request for a closed account to be re-opened |
| Account Cancellation Request | Request for an account to be closed |
| Annual Fee Refund Request | Requests for Annual Fee to be refunded |
| Back Bill /Misc. Adjustment Request | Requests for any debit to a merchant outside of their monthly processing statement |
| Refund Request | Requests for any fee-related refund, not including Annual Fees |
| Risk Management (Collections) | Inquiries to Collections related to held funds or current collection balances |
Ticket Reason and Description
Creating a Custom Report
To create a custom report tailored to your needs:
-
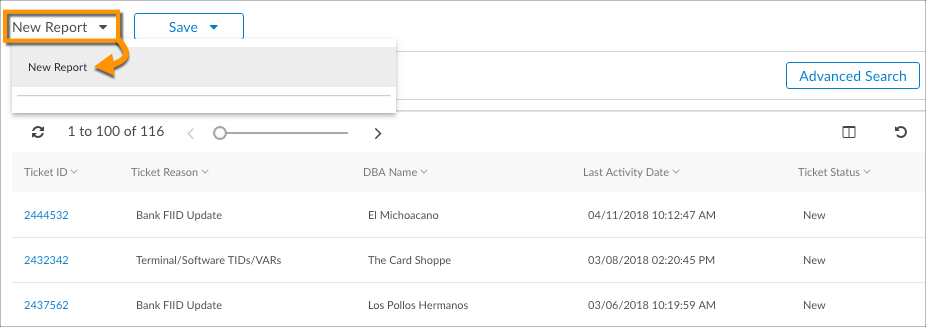
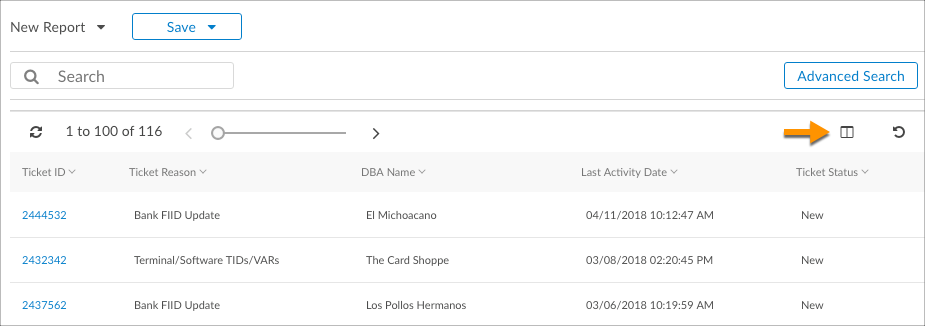
Navigate to the screen that you wish to customize for reporting purposes. In this example, we're going to customize the "Tickets" table.
-
Click the New Report dropdown and select New Report.
-
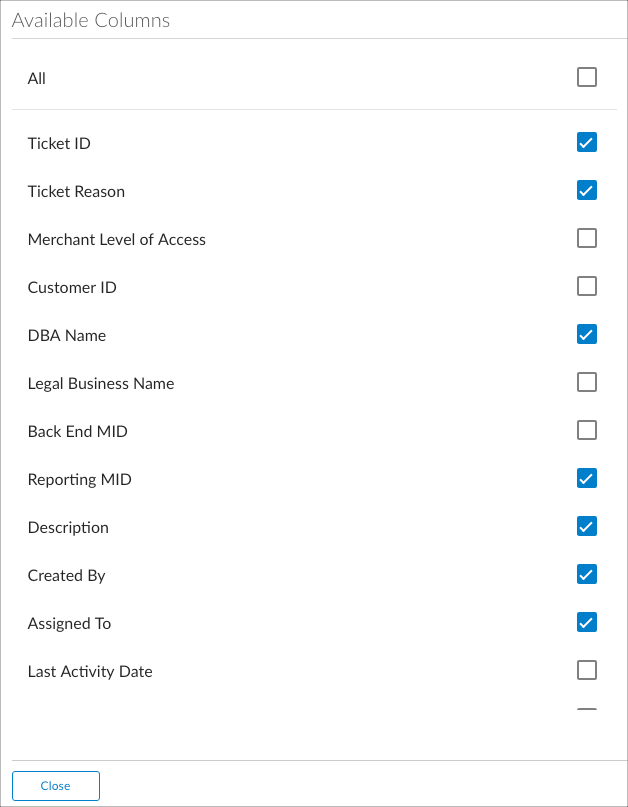
Click the Column Selector icon to customize the column filters that display in the table.
-
Choose the desired columns that you wish to include in the table, and click Close.
-
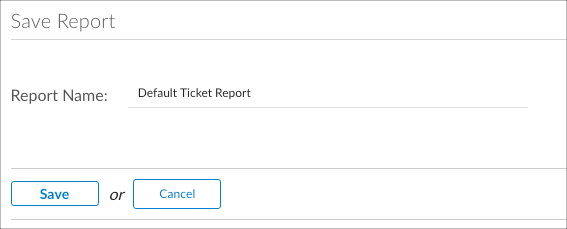
To save the customized table, click Save > Save As.

-
Give the report a name, and click Save.
-
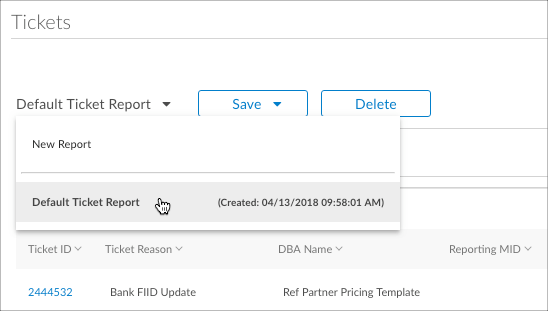
The custom report now displays in the dropdown menu that you previously used to create the report.
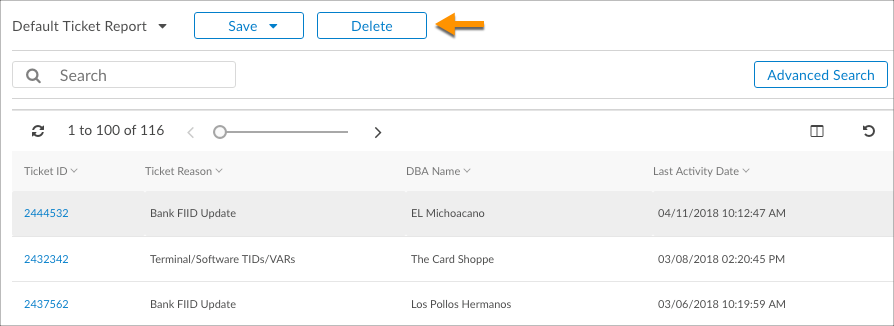
Deleting a Custom Report
To delete an existing report:
-
Navigate to the screen that contains the custom report(s) that you wish to delete.
-
Select the report that you wish to delete from the Reports dropdown.
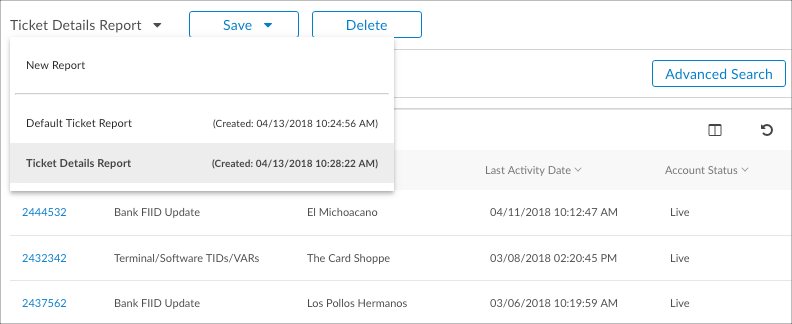
-
Click Delete and confirm that you wish to delete the selected report.

Managing CoPilot Users
In CoPilot, each user is uniquely identified with a username, password, and profile. The user profile determines which tasks a user can perform, what data the user can see, and what the user can do with the data.
Adding, modifying, and removing users is easy in CoPilot. Simply click Administration in the left nav to display a list of your organization's current users. From this screen you can edit an existing user's profile and create new CoPilot users.
User Roles
Assigning each user to specific user roles determines the navigation menu items and screens to which each user has access.
When creating a new user or editing an existing user, you can assign one of the following user roles to the user's profile:
- Admin User
Admin users can perform the following tasks in CoPilot:- View information for all sales codes
- View residuals for all sales codes
- Create and modify users
- Standard User
Standard users have permission settings that govern which sales codes they can view and which residuals they can view. These permissions are set at the sales code level. In addition, Standard users do not have the ability to create or modify CoPilot users.