-
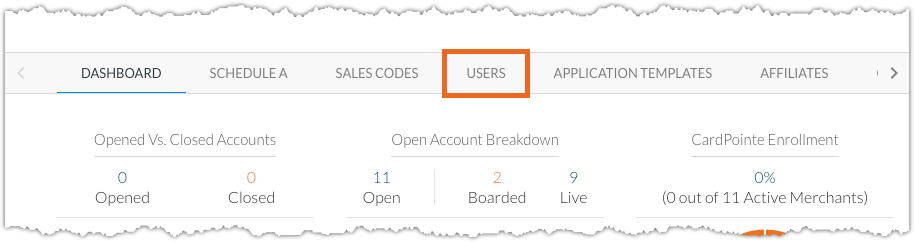
Select the Users tab from your CoPilot Dashboard.

-
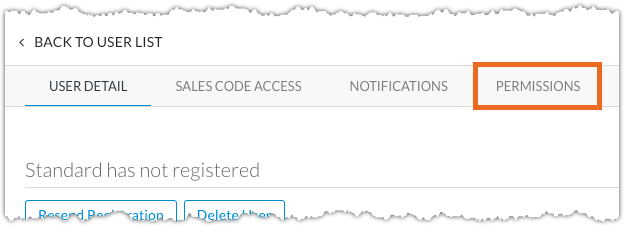
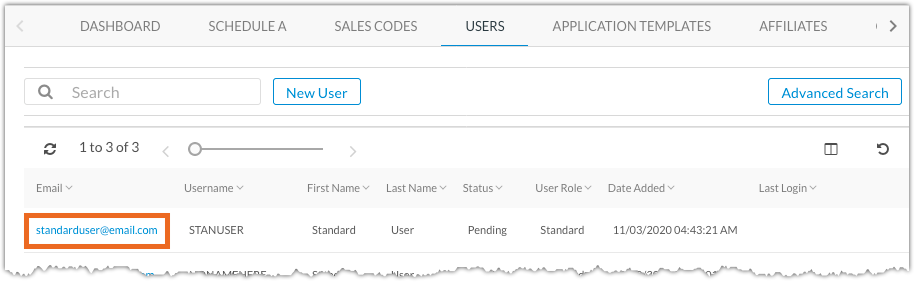
Select a user to view their current permissions.

-
Click the Permissions tab.
-
Review the permissions available in the Clover section and enable or disable permissions as necessary. For your user account, it is suggested to enable all permissions.
Permission Details View Clover Tab
When enabled, grants users the ability to view Clover tab on the Dashboard and access the sub-tabs.
Send App Updates
When enabled, grants the user the ability to send app updates to a device from the Device Details modal's Apps tab.
Export Clover Devices
When enabled, grants users the ability to export a list of devices associated with the partner from the Clover Devices table.
Manage Partner App Collection Promotions
When enabled, grants users the ability to manage the App Collection promoted to merchants in the Clover App Market.
Manage Partner Messaging Promotions
When enabled, grants users the ability to manage messaging shown on the Home Screen of Clover devices.
Associate Clover Devices
When enabled, grants users the ability to associate Clover devices with a merchant or another Clover Partner.
Disassociate Clover Devices
When enabled, grants users the ability to disassociate Clover devices from the current merchant.
Remote Support for Clover Devices
When enabled, grants users the ability to initiate remote support on a Clover device.
RD - Check Card Eligibility
When enabled, grants users the ability to check a merchant's card to determine eligibility for Rapid Deposit.
Uninstall All Paid Apps
When enabled, grants users the ability to uninstall Clover apps currently being billed to the merchant. 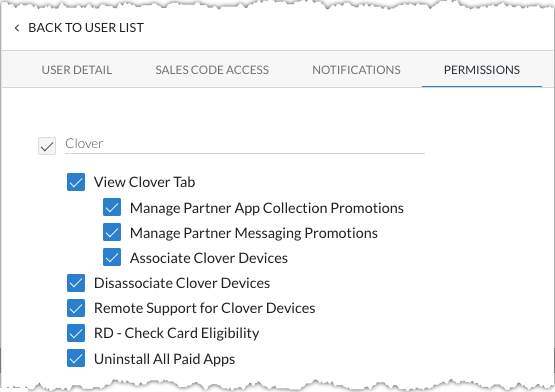
-
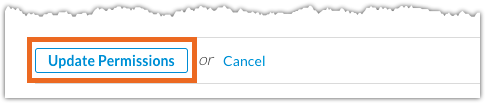
Click Update Permissions when finished and log out of CoPilot and back in for the permissions to take effect.

Some of the features described in this guide require specific user permissions. If you do not have access to a feature and would like to request permissions, contact your leadership for more information.
What's New?
This feature requires a new permission, Export Clover Devices. If you do not have this permission enabled, the button is hidden.
The Device Details modal has been enhanced with the following updates:
The following fields have been added to the Clover Details section:
ROM - The current ROM versions installed on the device.
Manufacturer Warranty - The beginning and end dates for the current manufacturer warranty, if applicable.
Protection Plan - The beginning and end dates for the current protection plan, if applicable.
A new SIM section (for associated devices) displays the following information:
Provider - The current wireless service provider.
ICCID - The serial number of the SIM card.
Wireless Plan - The current wireless plan for this device .
IIN - The first 7 digits of the ICCID, representing the industry code (always 89), country code, and issuer identifier.
A new Device History tab displays a list of actions that have been performed on the device (for example, when the device was activated), including the following information:
Action - The action performed on the device.
Merchant - The merchant account associated with the action. The merchant name is hidden if the merchant is not associated with your sales code.
Date - The date and time when the action was performed.
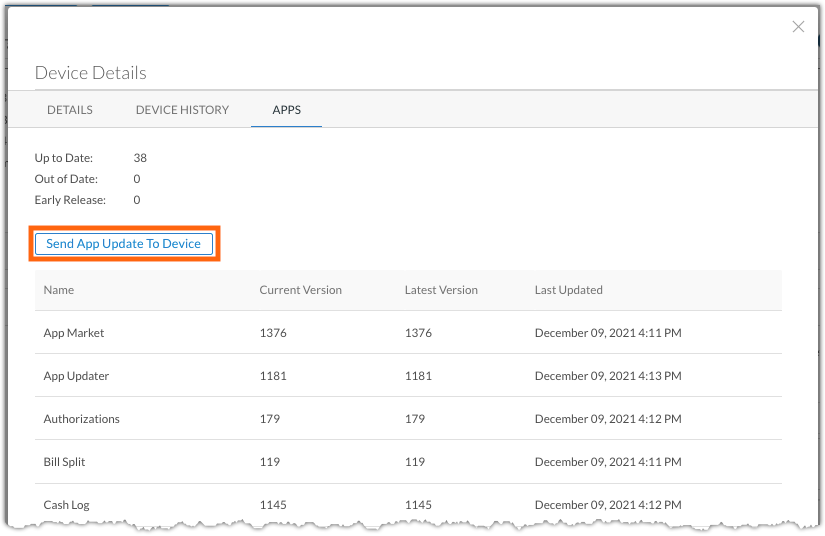
A new Apps tab (for associated devices) includes information on the apps installed on the device, including following details:
Up to Date - The number of apps that are currently up to date on the device.
Out of Date - The number of apps that are currently out of date on the device.
Early Releases - The number of apps with early releases.
Name - The name of the app.
Current Version - The current version of the app that is currently running and whether or not the app is out of date.
Latest Version - The latest version of the app available.
Last Updated - The date and time the app was last updated.
Additionally, the new Send App Update to Device button sends a request to the device to update all out of date apps to the latest version.
This feature requires a new permission, Send App Updates. If you do not have this permission enabled, the button is hidden.
The device must be powered on and connected to the internet to receive updates. If the device is offline, the request is held and automatically retried when the device comes online.
Date Updated: 11/17/2021
The following enhancements and updates were made available with the CoPilot 5.46 release on November 17th, 2021:
- The Customers table now includes optional Clover ID and Clover Partner ID columns, allowing you to filter accounts by these fields.
- The Customers table's Advanced Search feature includes new Clover ID and Clover Partner ID fields, allowing you to search for specific Clover ID or Clover Partner ID values.
Clover Tab
The new Clover tab of your CoPilot Dashboard contains the following sections for management of Clover features, which are covered in more detail below:
This results in you being able to view and manage all Clover devices and Clover-specific settings within the Clover tab of your Dashboard.
When performing Clover management tasks within the Clover tab of your dashboard, you will need to select the applicable Clover Partner from a drop-down menu before performing any actions. This ensures you are viewing the applicable Clover devices, Home Screen messaging, and Clover App suggestions for that Clover Partner.
Operational Considerations
By default, permissions for Clover management capabilities are disabled for all users. We recommend that you read this document in its entirety and enable permissions only for your account until you have become familiar with the various controls.
You should then assess if members of your organization require training and access to Clover management functions within CoPilot. You can then better formulate operational guidance and assign dedicated roles for these members within your operational structure.
Contact your relationship manager if you have questions or require additional guidance on this topic.
Navigation & Default Access
Your primary method of managing Clover equipment and Clover-specific settings is from within the new Clover tab of your Dashboard.
This Clover tab contains additional sub-tabs which are outlined briefly below, including the type of information and functions available to users based on their permissions set.
Clover Tab
Any user with the View Clover Tab permission is able to view all sub-tabs and has read-only access to any of the underlying information or details. Users with this permission are not able to perform any Clover management tasks unless you enable additional permissions at the user level.
Users without this permission are not able to view the Clover tab on the Dashboard or any of the underlying tabs or information.
Promotions Tab
Any user with the View Clover Tab permission is able to view all information and details within the Promotions sub-tab. The ability for a user to edit the Home Screen messaging or create and update the Clover App suggestions is dependent on whether the user has the necessary permissions for these functions.
Clover Partners Tab
Any user with the View Clover Tab permission is able to view details within the Clover Partners sub-tab. Clover Partner details and permissions are read-only for all users.
Sub-Partner Permissions Tab
Any user with the View Clover Tab permission is able to view details within the Sub-Partner Permissions sub-tab.
Permissions Structure
You control permissions primarily on a user-level, however there are additional requirements and restrictions you should be aware of:
- At least one of your Sales Codes must have a Clover Partner assigned. Typically this step is already completed by your relationship manager.
- Users with Clover permissions are further limited by their Sales Code Access settings. For Sales Codes that the user does not have access to, attempting to perform any Clover management tasks will result in an error message even when the user has the necessary user permissions. This limitation does not apply to your own Super Admin account, as you have access to all Sales Code by default.
- Users with Clover permissions are further limited by the Clover Partner permissions. Users with the necessary permissions and Sales Code access receive an error message when attempting to perform Clover management functions that are disabled at the Clover Partner level.
This permissions structure ensures that users with Clover permissions are not able to perform Clover management tasks for Sales Codes they do not have access to, or for Clover Partners where the permission has been disabled completely.
Sales Code Settings
In order for any user to access Clover management functions, at least one of your Sales Codes must have a Clover Partner assigned. Your existing Sales Codes containing merchants with Clover equipment should already have a Clover Partner assigned. For new Sales Codes that you create, you will need to request that a Clover Partner is assigned if the Sales Code will be used to board merchants using Clover equipment.
Sales Codes require a Clover Partner in order for Clover equipment to show in the available equipment list for merchants.
Unless your organization has sub-divisions, affiliates, or a complex operational structure, your existing Clover Partner is typically assigned to newly created Sales Codes.
User Settings
By default, the Clover tab on your CoPilot Dashboard is hidden for all users and all other Clover-related permissions are disabled. Enable the Clover permissions as outlined below, and be sure to review the Sales Code Access settings for any other trusted users that require Clover permissions.
User Permissions
Before you can take advantage of any of the Clover management features, you must ensure your account has the necessary permissions to access these features. You can review the Clover permissions for your account and other CoPilot users by following the steps below
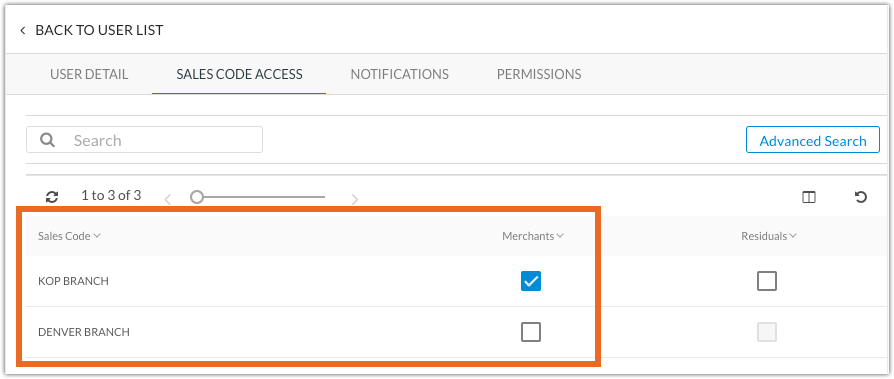
User Sales Code Access
When enabling Clover permissions for other users, be sure to review their Sales Code Access settings as shown below.
Users with Clover permissions are able to complete Clover management tasks only for Sales Codes the user has access to. For Sales Codes that the user does not have access to, an error message is displayed to the user informing them that they lack the necessary access.
-
Select the Users tab from your CoPilot Dashboard.
-
Select a user to view their current Sales Code Access settings.
-
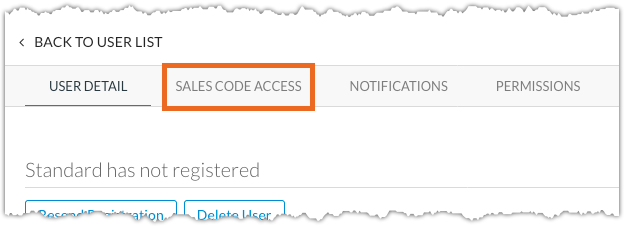
Click the Sales Code Access tab.
-
Review the Sales Codes that the user has access to and enable or disable access to Sales Codes if necessary.
Clover Partner Settings
Access to Clover management features are also limited by the permissions set at the Clover Partner level. The permissions set at the Clover Partner level control which features are available for merchants and merchant devices of the Clover Partner, and cannot be adjusted without contacting your Relationship Manager.
These permissions add an additional layer of control on top of user permissions, in order to allow or restrict the ability to perform certain management functions, regardless of any user's individual Clover permissions.
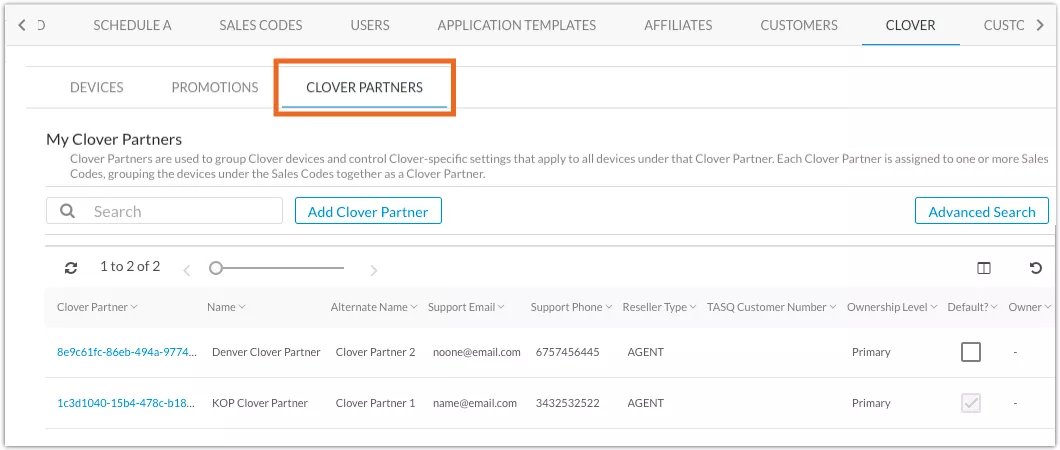
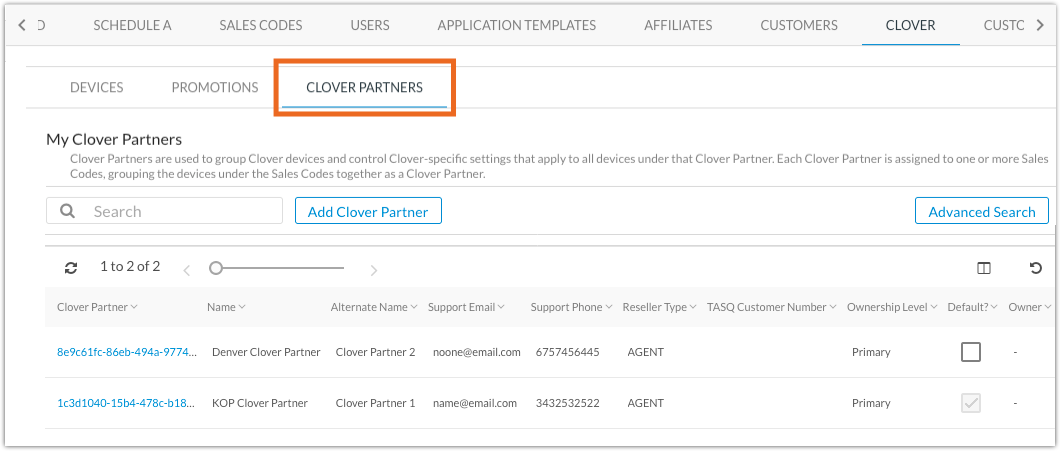
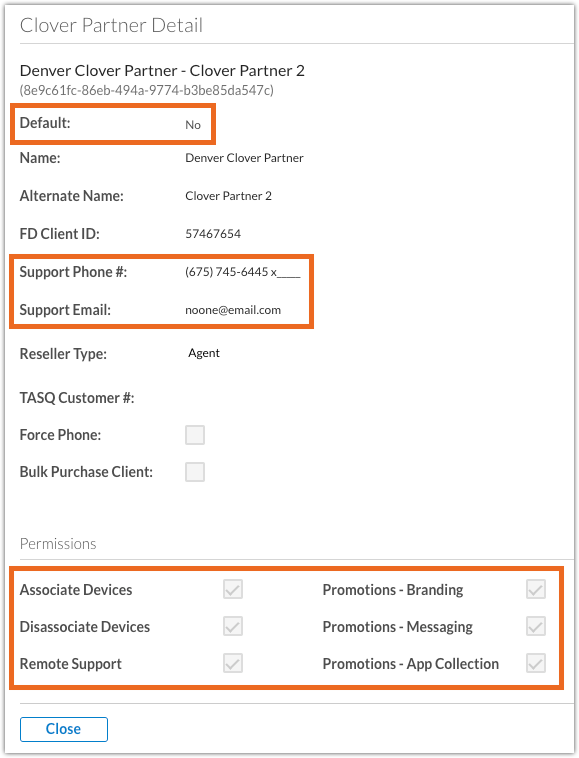
You can view the current permissions set for any of your Clover Partners from the Clover Partner tab as shown below.
-
Click the Clover tab from your Dashboard.
-
Click the Clover Partners tab.
-
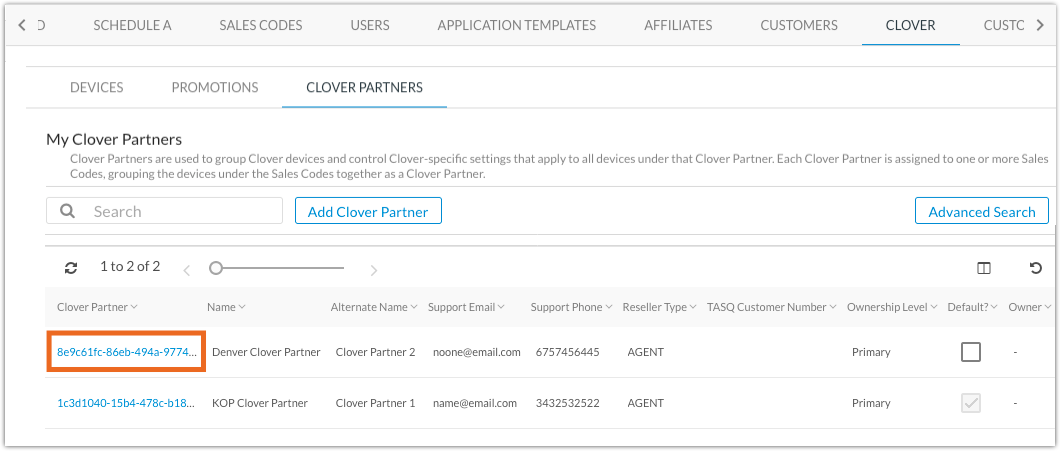
Click a Clover Partner.
-
Here you can view the support contact information set for this Clover Partner, as well as the permissions enabled for various Clover management functions.
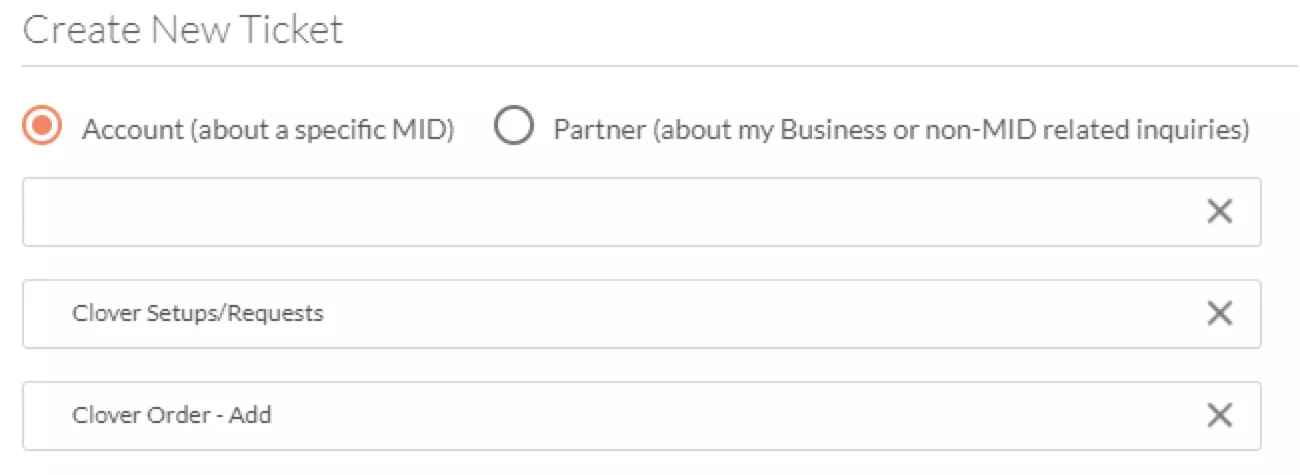
The Clover Go is not displayed within the Devices tab. The management features available on this page are not applicable to the device. Reallocation must be requested by submitting an Account Ticket, Clover Setups/Requests > Clover Order – Add. In the ticket, be sure to specify “Please add Clover Go”.
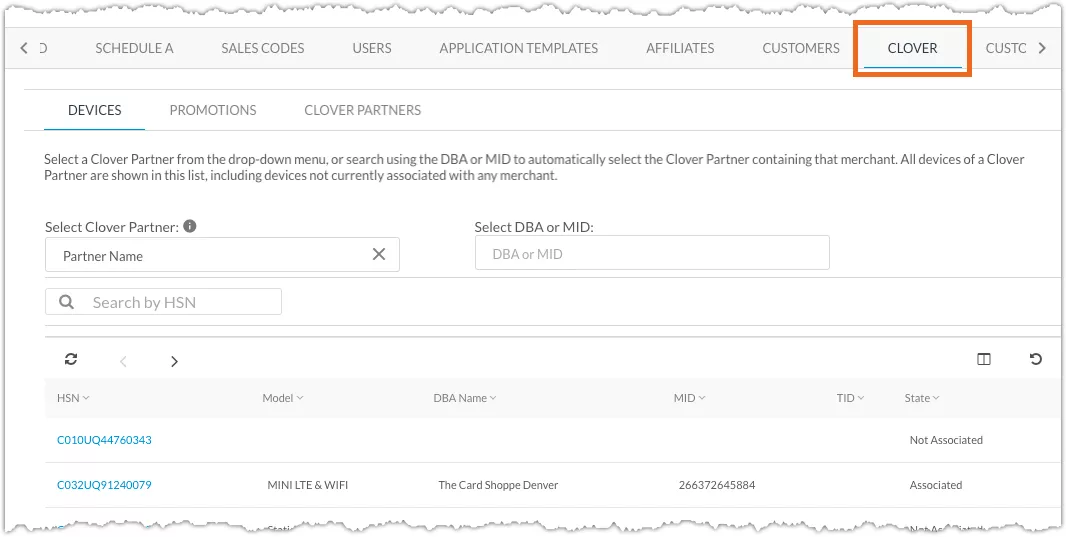
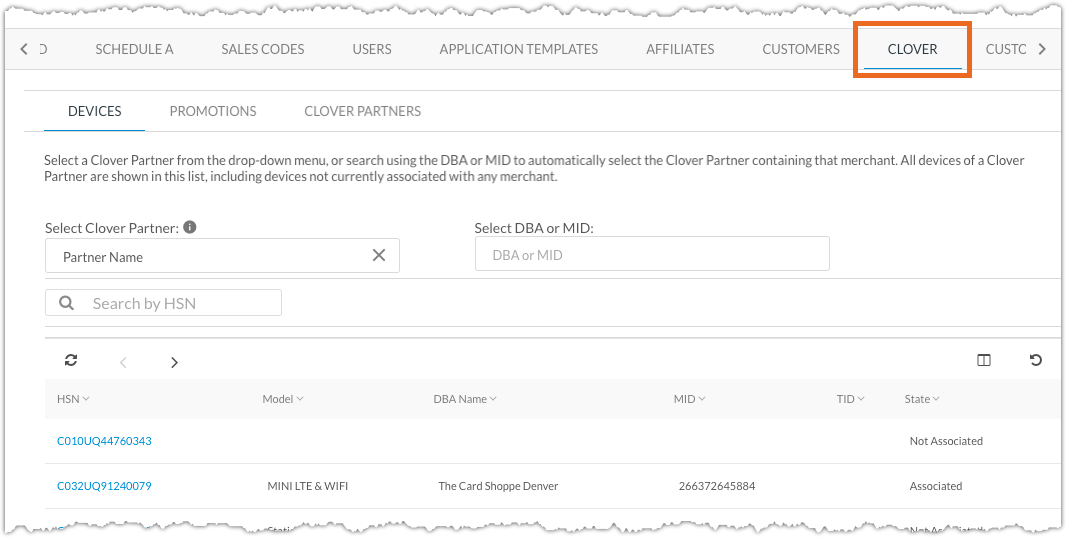
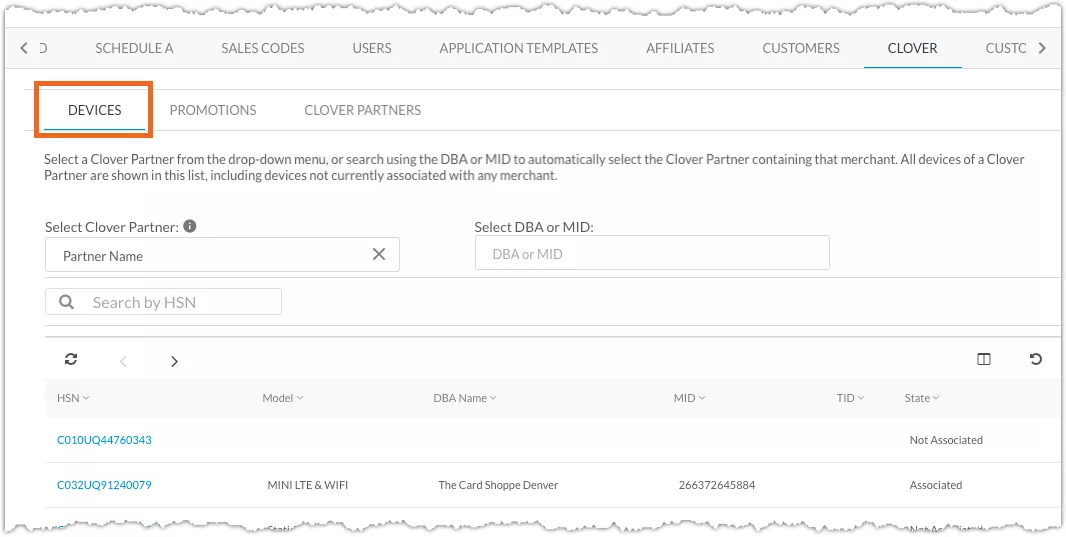
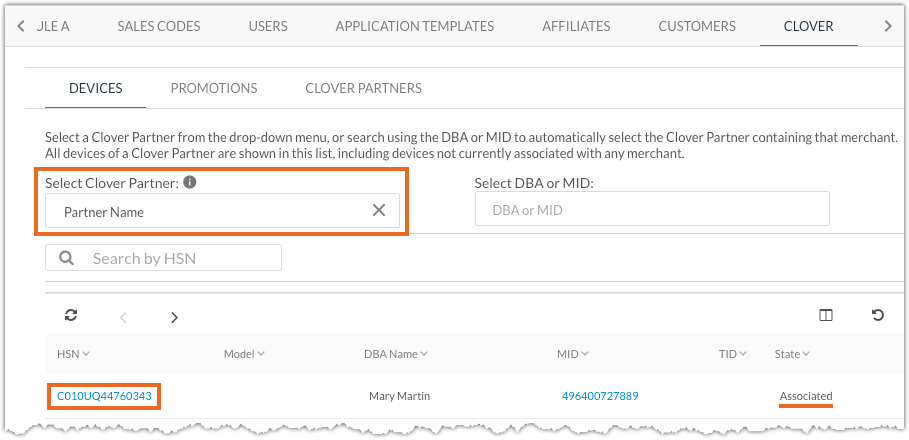
When ordering a Clover device for a merchant, CoPilot automatically associates the device with the Clover Partner of the merchant's Sales Code. You can then view the device from the merchant's page as you regularly would, or view within the Devices sub-tab when selecting the applicable Clover Partner from the drop-down menu.
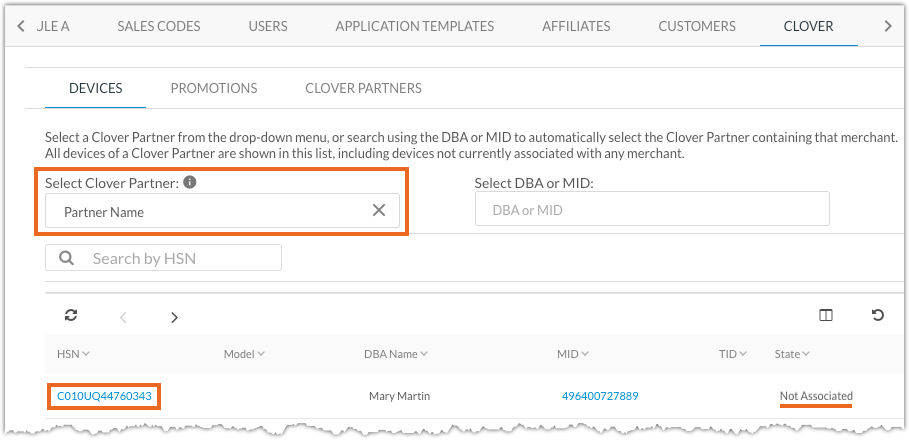
When accessing the Devices sub-tab, select a Clover Partner from the drop-down menu to see all Clover devices of that Clover Partner. This list includes devices that may no longer be associated with a merchant, but are still available to merchants of the Clover Partner.
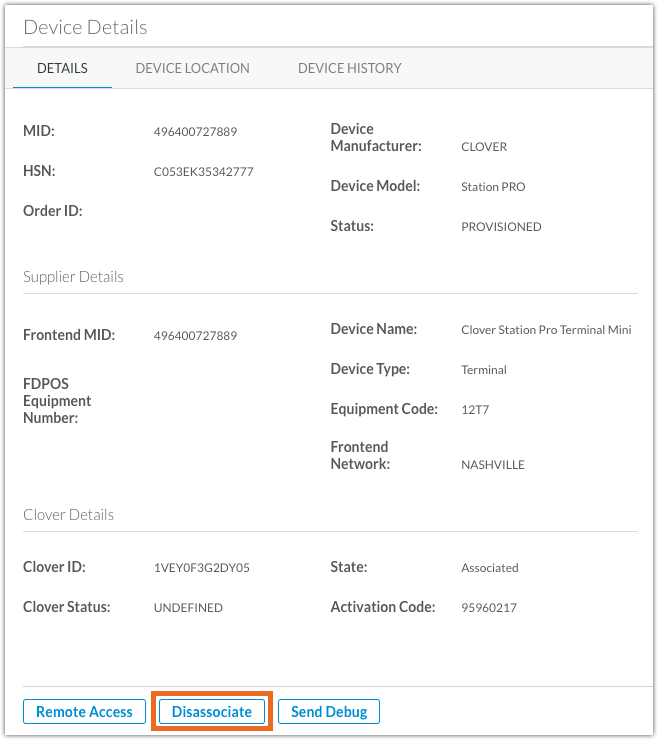
Click a device HSN to view the device details, disassociate the device from the current merchant, associate an available device to a new merchant, and initiate remote access to view the device's screen and assist merchants with troubleshooting.
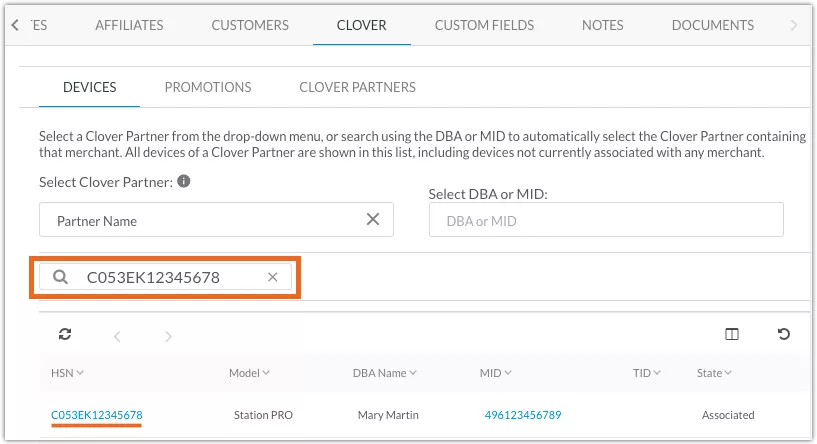
Searching for a Device
Enter the full Hardware Serial Number (HSN) of a device in the search box or select the DBA or MID to filter the device table.
Disassociating a Device
You can disassociate a Clover device from an existing merchant account to disable the device for that merchant. This also removes the merchant data on the device and allows it to be associated with another merchant or with another Clover Partner in your account.
When disassociating a device from a merchant, the device remains available in the list of devices for the current Clover Partner with a status of Not Associated. This device can then be associated with any other merchant under the current Clover Partner, or can be associated with a different Clover Partner within your account.
Your CoPilot user account requires the necessary permissions in order to disassociate a Clover device from the current merchant. If you receive an error when attempting to disassociate a device, contact your leadership for assistance.
You can also disassociate devices from a merchant by accessing the Devices section of a specific merchant account and selecting the device ID.
Ensure that the device is no longer being used by the merchant before disassociating. Disassociating the device from the merchant will initiate a factory reset and erase the merchant data, as well as any offline transactions.
-
Use the Select Clover Partner drop-down from the Devices sub-tab to select a Clover Partner and then select the HSN of a device that is currently associated with a MID.

-
Click the Disassociate button.
-
Check the box to confirm that you want to disassociate the device from the current merchant and click the Disassociate Device button.
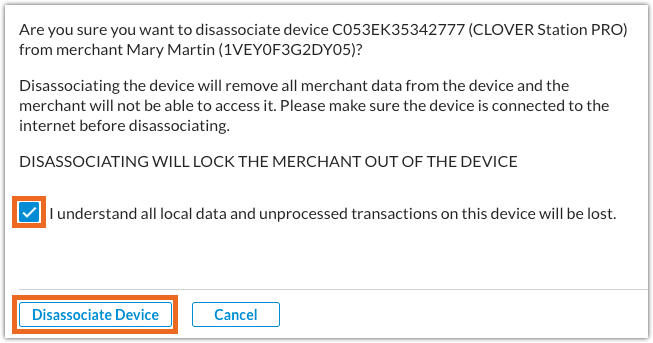
The device status may take a few minutes to update, and can be associated with another merchant account or to be allocated to another Clover Partner within your account once the state reads Not Associated.
Associating a Device
If you have disassociated a device from an existing merchant, or you have unassociated devices held as inventory, you can associate an available device with a specific merchant or Clover Partner in your account by following the steps below.
Your CoPilot account requires the necessary permissions in order to associate devices with a merchant or another Clover Partner. If you receive an error when attempting to associate a device, contact your leadership for assistance.
Associating a Device with a Merchant Account
Associate a Clover device with a merchant account in order to load the merchant data on the device and enable it for use with the selected merchant. If the device will be shipped to the merchant rather than hand-delivered, ensure that you have the tracking information available before starting the association process below.
-
Use the Select Clover Partner drop-down from the Devices sub-tab to select a Clover Partner and then select the HSN of a device that is currently in a Not Associated state.
-
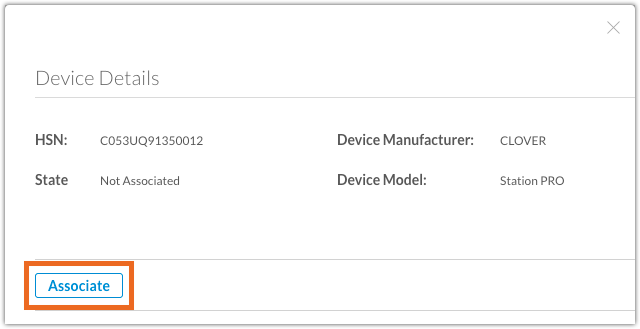
Click the Associate button within the Device Details modal.
-
Select the Merchant option and click the text box to search and select the applicable merchant account.
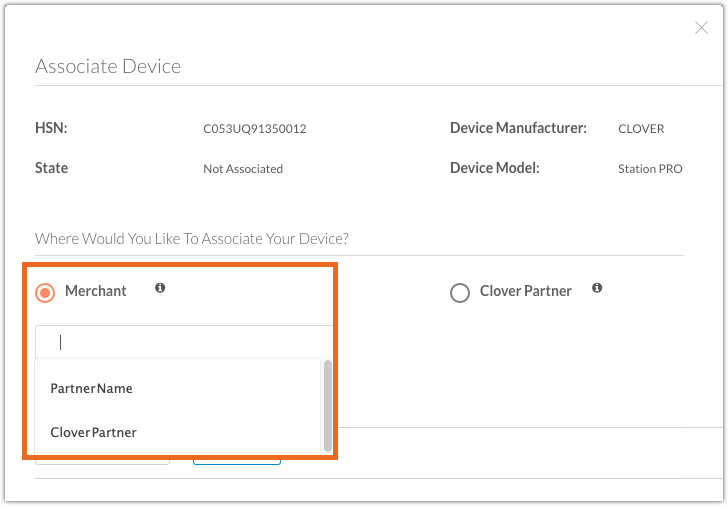
-
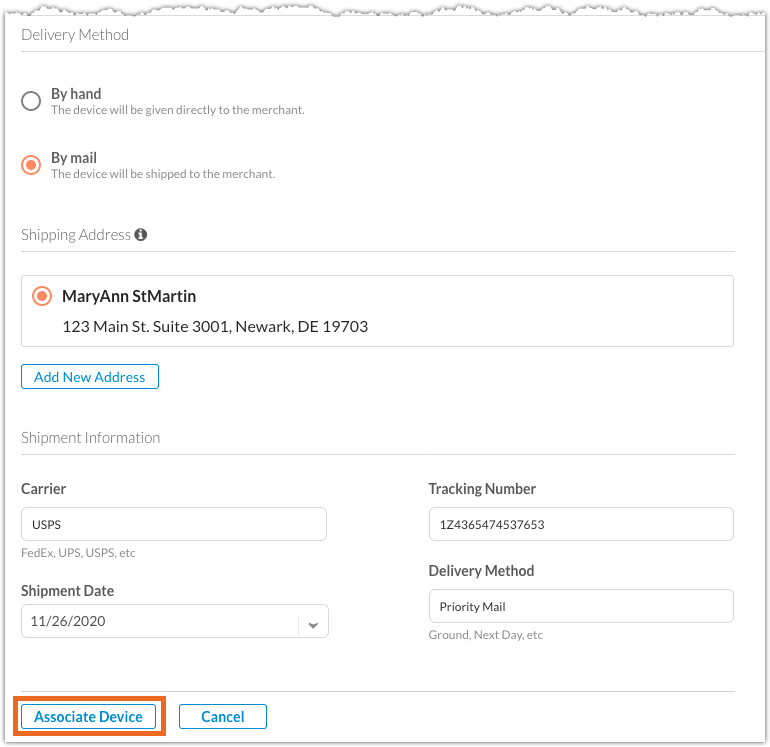
Select the Delivery Method and provide the required delivery information. Then click Associate Device.
Merchants that are net new to Clover require an order for Clover Software RC to be provisioned before a Clover device can be associated to the account.
If presented with the following warning, click the Create & Submit Order button to begin this process. Wait until the order ticket has been processed and has reached the Closed status before attempting to associate a device to this merchant again.
Our support team typically fulfills requests like these within 48 hours or less.

-
Use the Select Clover Partner drop-down from the Devices sub-tab to select a Clover Partner and then select the HSN of a device to view the Device Details.

-
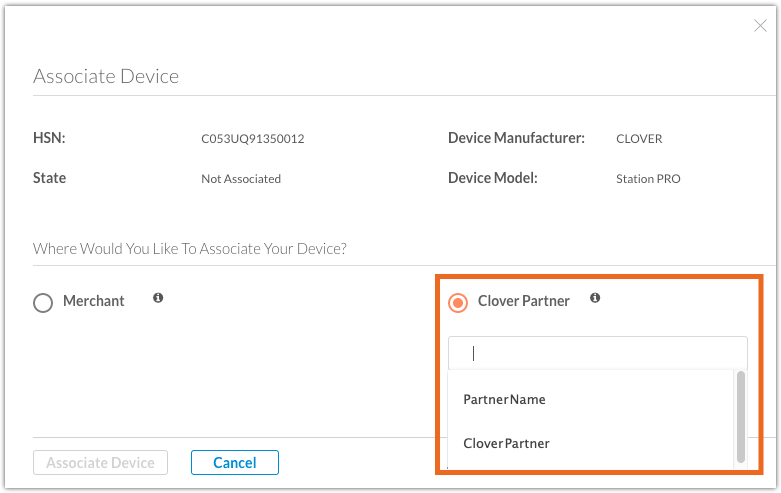
Click the Associate button within the Device Details modal.

-
Select the Clover Partner option and click the text box to search and select the applicable Clover Partner.
-
Click Associate Device to associate the device with the selected Clover Partner.
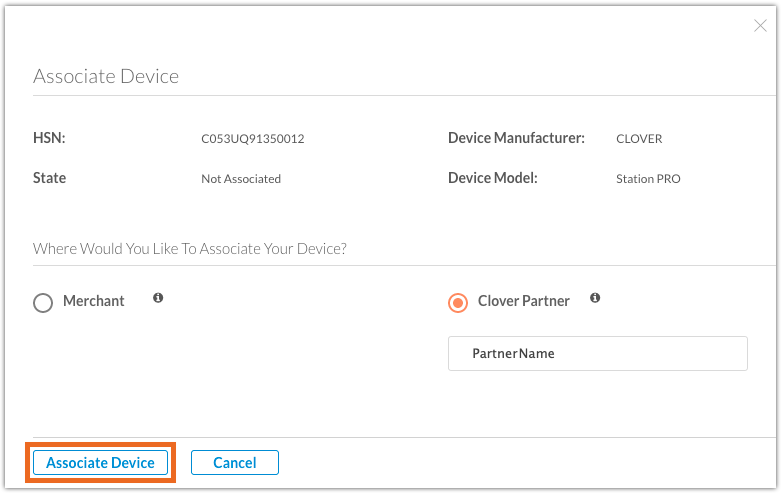
The device is now available for association with any merchant under the Clover Partner selected, and the device inherits the Merchant Messaging and App Collection configuration for that Clover Partner.
Initiating Remote Access
Use the Remote Access function to view the screen of a merchant's Clover device in order to assist with troubleshooting and support.
Your CoPilot Account requires the necessary permissions to initiate remote access on a Clover device. If you receive an error when attempting to use the Remote Access function, contact your leadership for assistance.
You can also initiate remote support by accessing the Devices section of a specific merchant account and selecting the device ID.
-
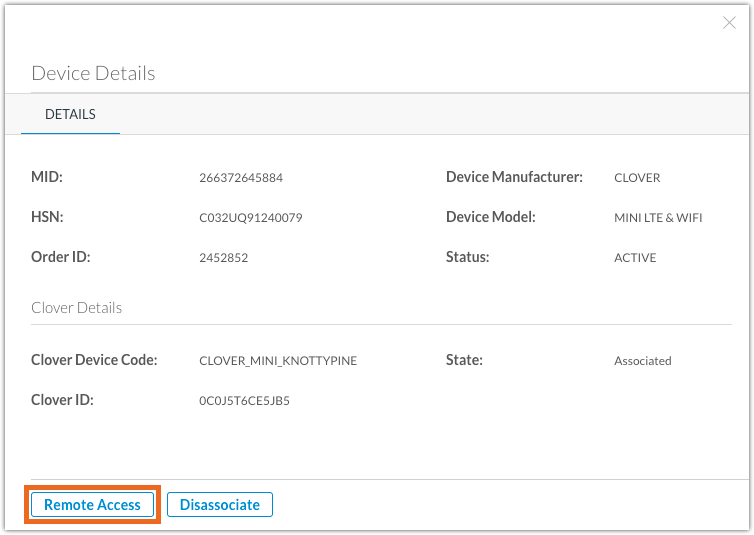
Use the Select Clover Partner drop-down from the Devices sub-tab to select a Clover Partner and then select the HSN of a device to view the Device Details.

-
Click the Remote Access button to initiate remote support on the device.
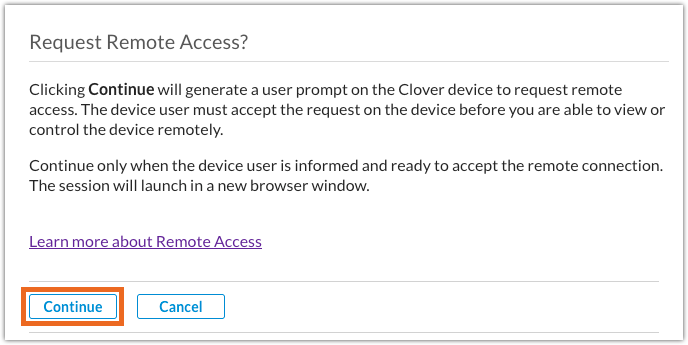
-
Click Continue when the device user is prepared to approve the remote connection.
-
A new browser window is launched to display the Clover device screen.
Direct the merchant to accept the remote access confirmation prompt they receive on the device. Once the merchant accepts the connection, your browser window loads the Clover device screen and updates in real time.
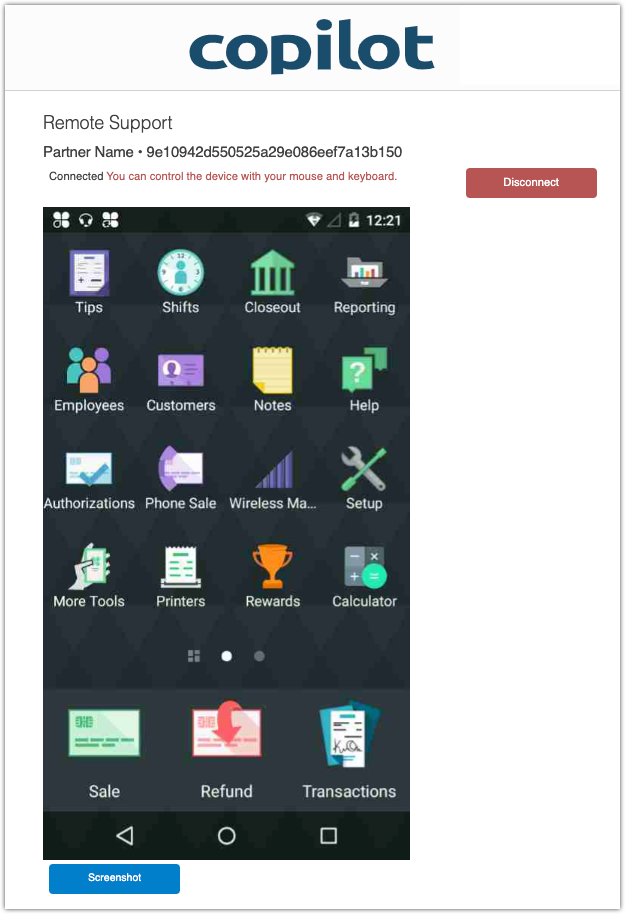
You can now use view the device's screen in real-time. Use your mouse and keyboard to control the Clover device remotely. Click the Screenshot button to take a screenshot of the device's screen and click Disconnect when you are ready to end the remote support session.
Keep the following in mind when initiating remote support for a Clover device:
- The Clover device must be associated to a merchant account.
- The Clover device must be connected to the internet.
- The merchant must have access to the device in order to accept the remote connection prompt that appears on screen.
- Each device can only support one remote support connection at any time.
Sending Device Debug Information
You can use the Send Debug function to send a debug log from the device directly to Clover for troubleshooting purposes.
In cases where the device is encountering errors, not recognizing other connected Clover accessories, there is an issue with the device's display, or any other issue that requires advanced troubleshooting, you should use the Send Debug function to send the device's debug log directly to Clover.
-
Use the Select Clover Partner drop-down from the Devices sub-tab to select a Clover Partner and then select the HSN of the device.
-
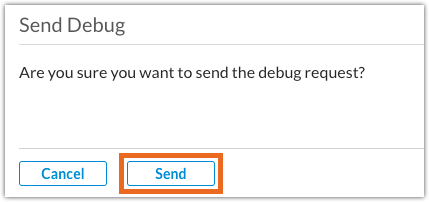
Click the Send Debug button.

-
Click the Send button to to send the device's debug log directly to Clover.
After sending the debug log to Clover, advise the merchant to contact Clover support for advanced troubleshooting.
Updating Apps
From the Device Details modal's Apps tab, you can use the Send App Update To Device function to update all out-of-date apps on a device.
- The Clover device must be associated to a merchant account. The Apps tab is not displayed for disassociated devices.
- Your CoPilot Account requires the necessary permissions to update apps. If the Send App Update To Device button is not available, contact your leadership for assistance.
- The device must be powered on and connected to the internet to receive updates. If the device is offline, the request is held and automatically retried when the device comes online.
The Apps tab displays a list of all applications installed on the device, including the current version installed and the latest version available.
Click Send App Update To Device to update all out-of-date applications to the latest version available.
Managing Merchant Messaging
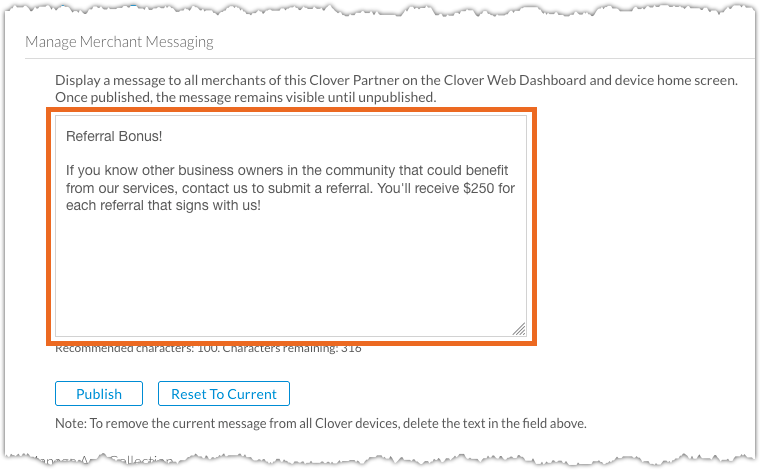
Use the Manage Merchant Messaging section of the Promotions sub-tab to set and update the messaging shown on the Home Screen of all Clover devices. This is useful for when you have messaging that is applicable to all merchants, such as changes in statement fees, advanced notice for upcoming closures or changes in business hours, or to advertise campaigns and promotions.
Your CoPilot Account requires the necessary permissions to set or modify the messaging for the Clover Partner. If the Publish or Unpublish button is not available, contact your leadership for assistance.
-
Click the Promotions sub-tab.

-
Use the Select Clover Partner drop-down to select the applicable Clover Partner.

-
Enter a message to display on the Home Screen for all Clover devices of the Clover Partner in the Manage Merchant Messaging text box.
-
Click the Publish button to update the Home Screen message for all Clover devices.
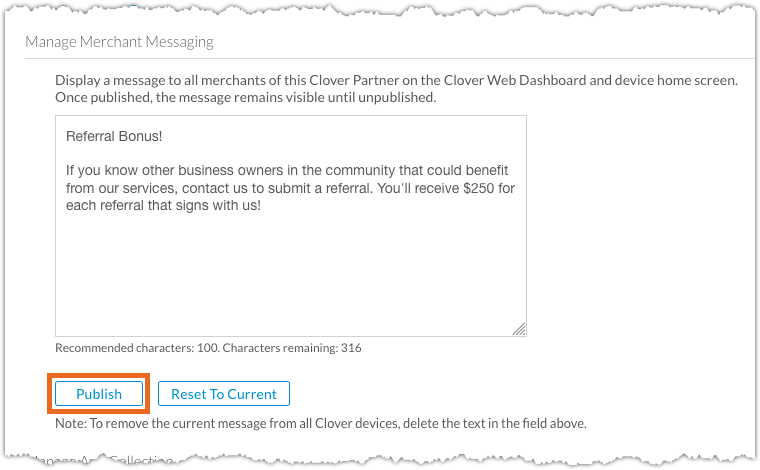
To remove the messaging shown on Clover devices for this Clover Partner, erase the message completely and then click the Unpublish button.
Managing the App Collection
Use the Manage App Collection section to manage the Clover Apps that are suggested to merchants within the Clover App Market.
Your CoPilot user account requires the necessary permissions to create, modify, or publish the App Collection for the Clover Partner. If this feature is unavailable to you, contact your leadership for assistance.
-
Click the Promotions sub-tab.

-
Use the Select Clover Partner drop-down to select the applicable Clover Partner.

-
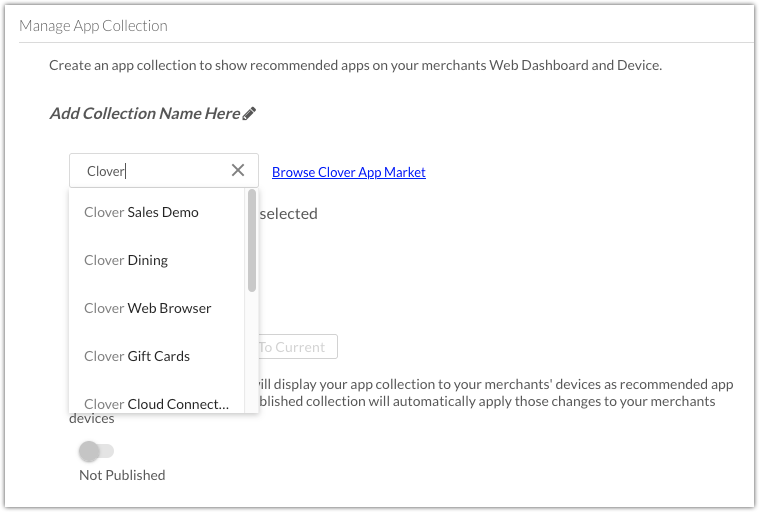
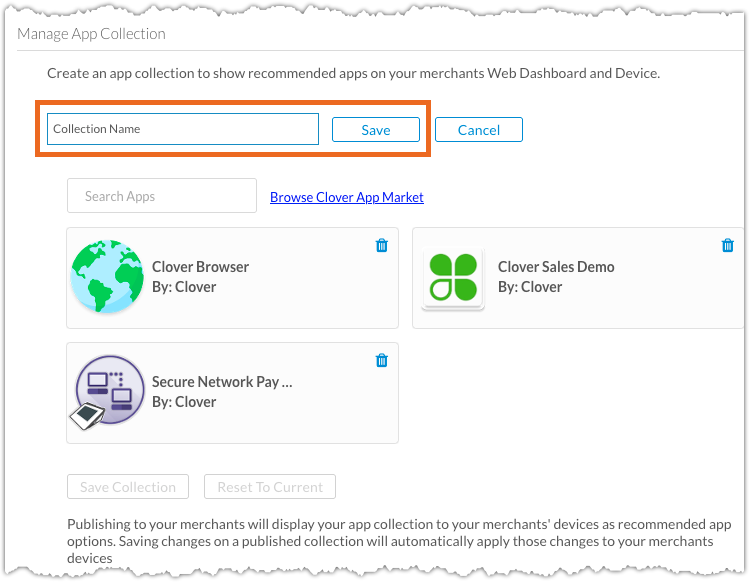
Use the Search Apps text box to search and select Clover Apps to add to the App Collection. Use the Browse Clover App Market link to browse the available apps. Repeat this step to add additional Clover Apps to the collection.
-
Click and drag apps to a new position to reorder the way apps are displayed on merchant devices and the Clover Dash.
-
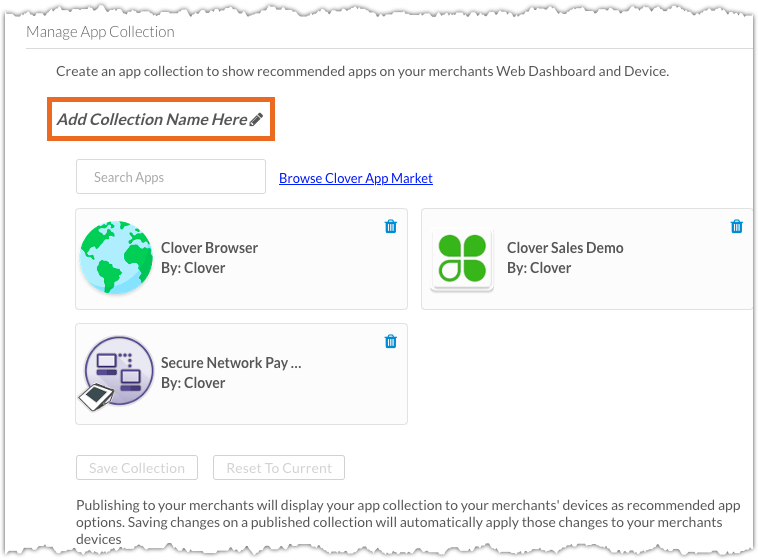
Click Add Collection Name Here to enter a name for the App Collection.
-
Enter a name for the collection and then click Save.
-
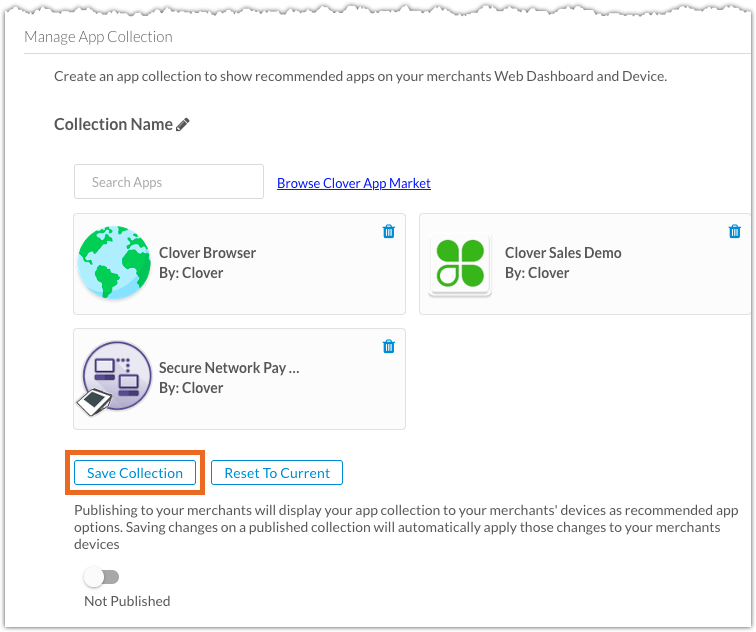
Click the Save Collection button to save the Clover Apps added to this collection.
-
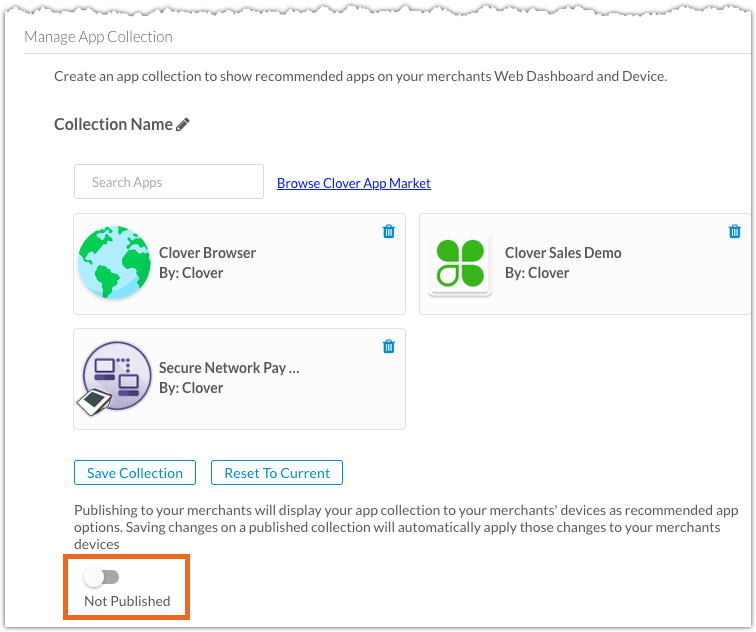
When you are ready to update the App Collection shown on all Clover devices, click the Not Published toggle.
-
Click Publish to confirm that you want to publish the App Collection to merchants of this Clover Partner.
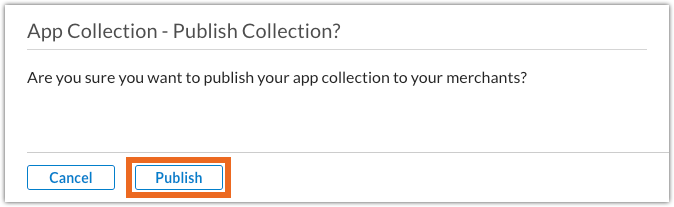
The App Collection is now shown to merchants of this Clover Partner when accessing the More Tools app on their device, and when accessing the More Tools section of the Clover Web Dashboard.
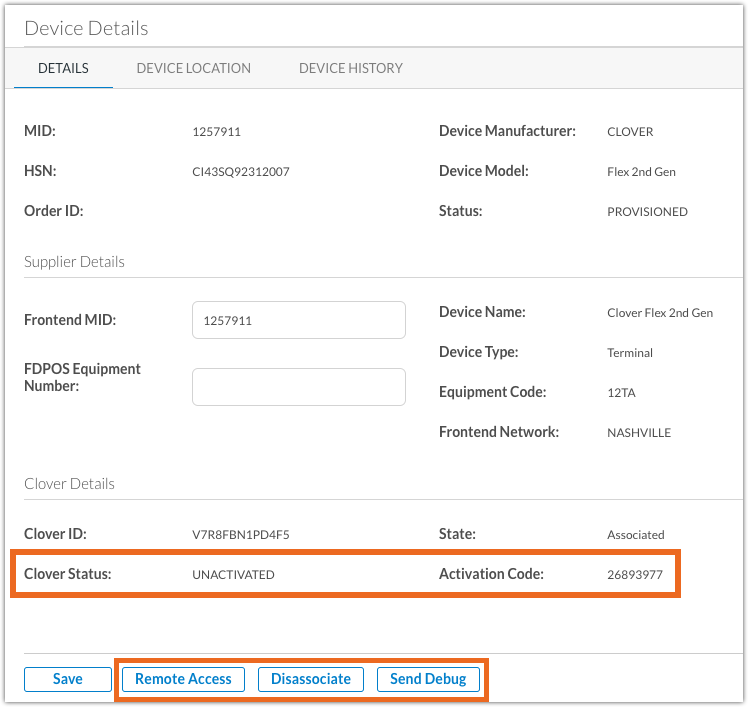
Devices Page
From a merchant's Devices page, you can view the Clover device Status and Activation Code, and perform functions such as Remote Access, Disassociate, and Send Debug just as you can from the Clover tab of your Dashboard.
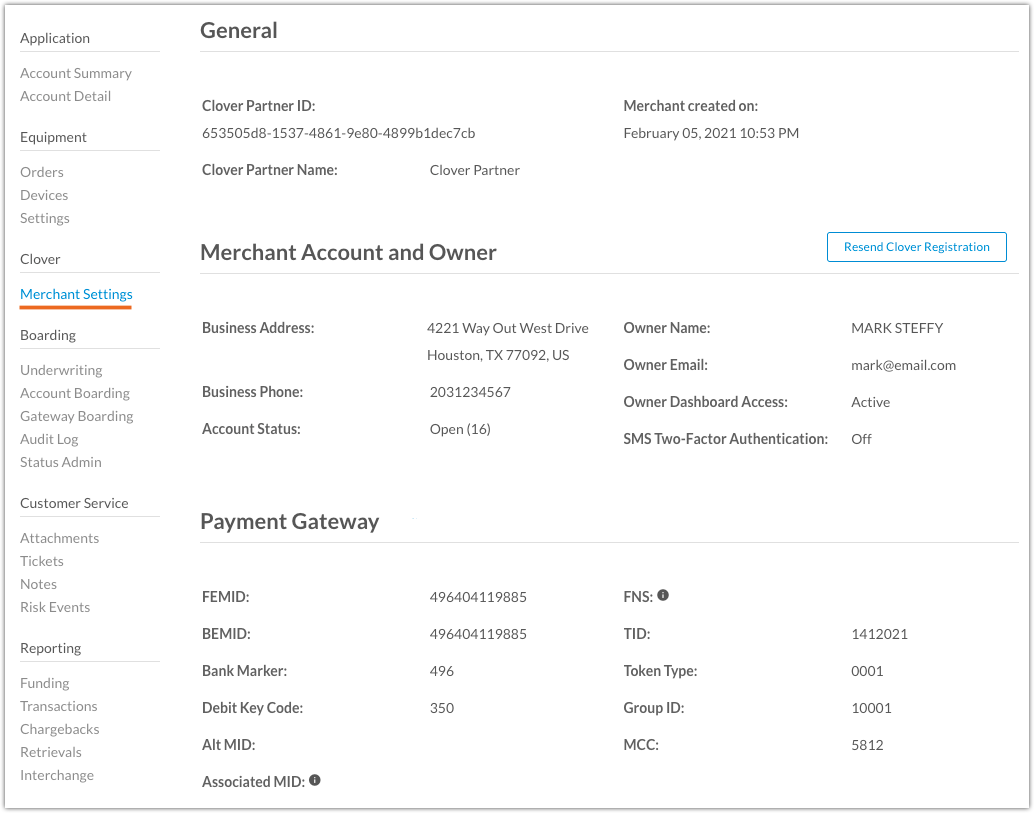
Merchant Settings Page
The Merchant Settings page is available for merchants under a Sales Code associated with a Clover Partner.
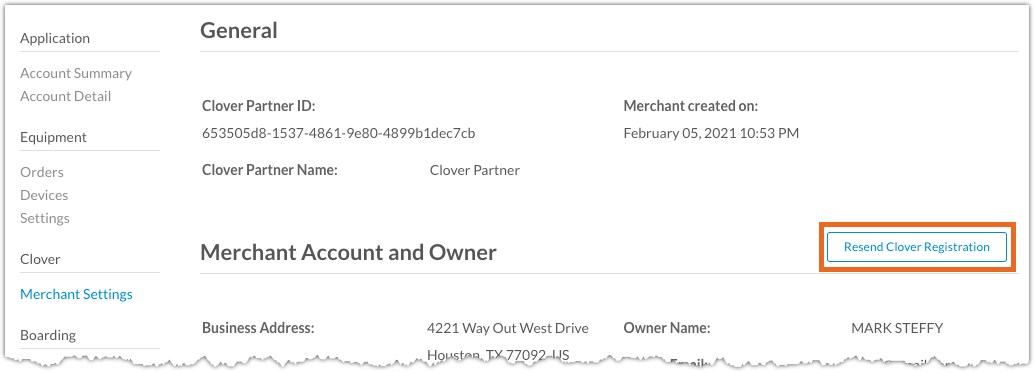
The Merchant Settings page displays detailed information on the merchant's configuration. Additionally, you can resend the Clover registration email for merchants who have not completed their registration.
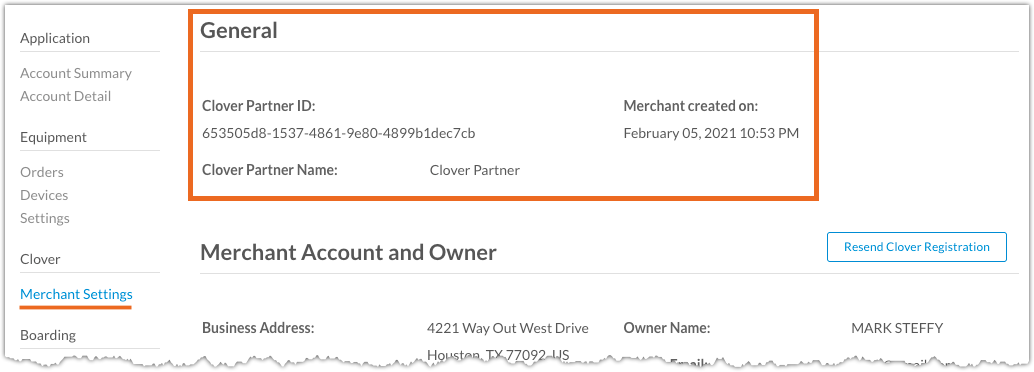
Determining Clover Partner
View the General section to see which Clover Partner this merchant account falls under, as well as more specific Clover Partner details.
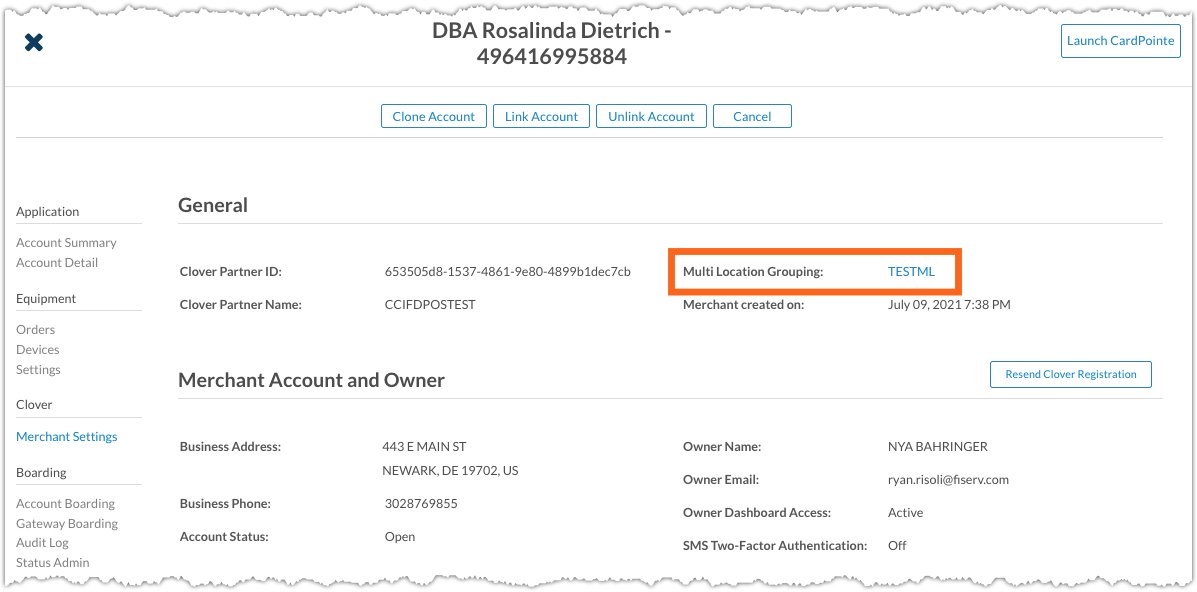
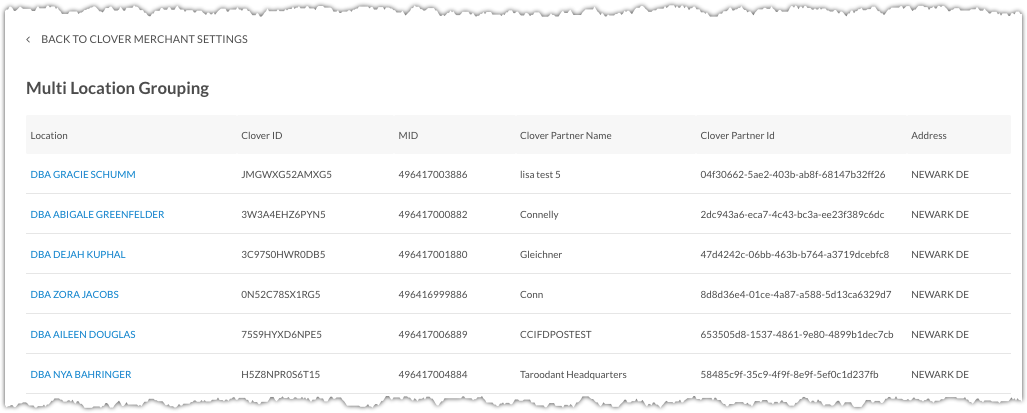
The Multi Location Grouping table displays basic details for each merchant in the multi-location group. Click a location name to view the Merchant Settings page of that merchant account, or click Back to Clover Merchant Settings to return to the previous page.
To link merchant locations or make changes to a multi-location group, you must access the Clover Dashboard.
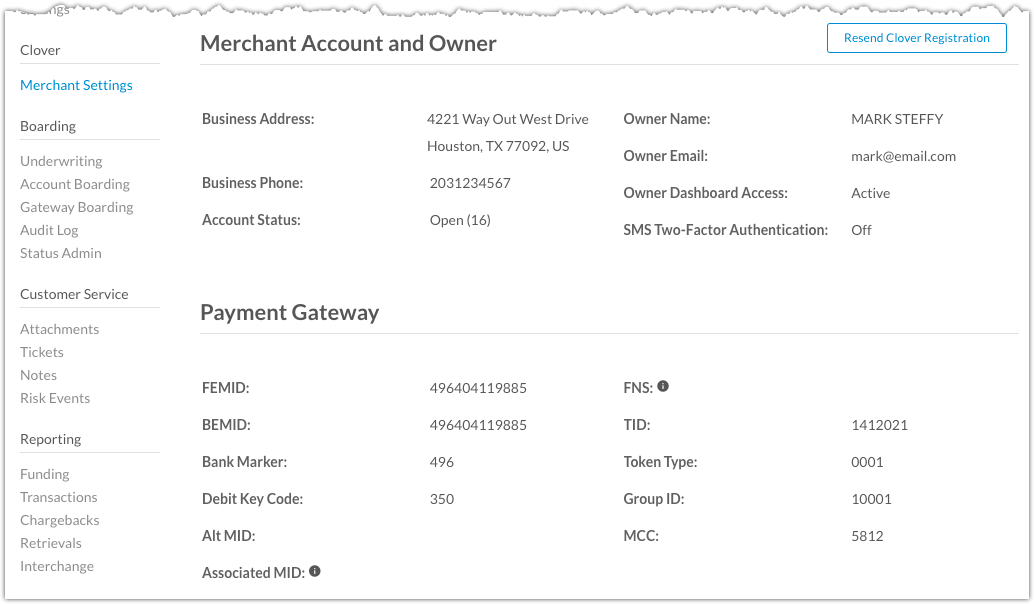
Viewing Account and Payment Gateway Information
You can also view details regarding the merchant account and owner information, such as the owner's name, email, business address, account status, as well as Payment Gateway information.
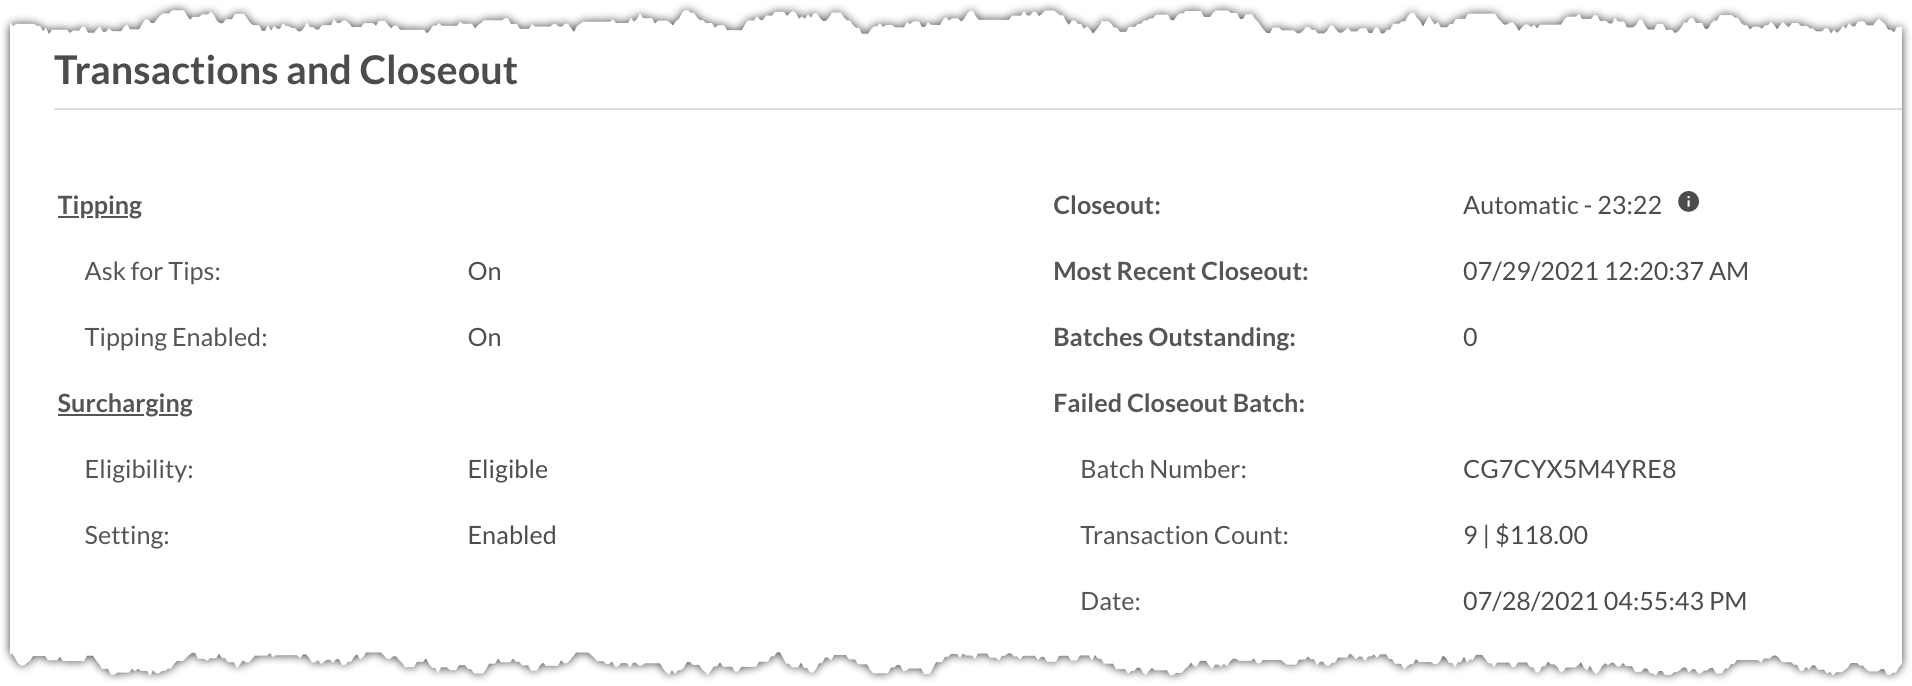
This section includes the following fields:
| Field | Description |
|---|---|
| Tipping - Ask for Tips |
|
| Tipping - Tipping Enabled |
|
| Surcharging - Eligibility |
|
| Surcharging - Setting |
|
| Closeout |
|
| Most Recent Closeout | The date and time (US Eastern Time) of the most recent closeout. |
| Batches Outstanding | The number of batches pending closeout. |
| Failed Closeout Batch | Includes the following information for the failed closeout batch:
Note: The Failed Closeout Batch section only displays when a batch closeout has failed, and disappears once the batch is closed or resolved. |
Viewing Plan and Billing Information
The Plan and Billing section displays the following information on the merchant's current service plan, pricing model, and other billing-related details.
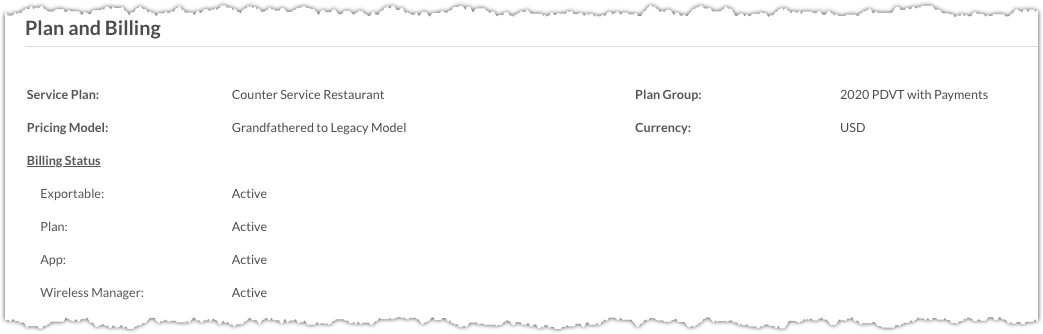
This section includes the following fields:
| Field | Description |
|---|---|
| Service Plan | The name of the merchant's current Clover service plan |
| Pricing Model | The name of the merchant's current Clover pricing model |
| Exportable |
|
| Plan |
|
| App |
|
| Wireless Manager |
|
| Plan Group | The merchant plan group that the merchant plan belongs to. |
| Off Boarding Status & Date | The current status of an off-boarded account (for example, On Hold or Cancelled) and the date when off-boarding occurred |
| Plan Trial Information | Plan trial details, if applicable. |
| Currency | The currency used for settlement to the merchant's account |
Additionally, if your user account includes the necessary permission, the Uninstall All Paid Apps feature allows you to easily uninstall all paid applications currently billed to the merchant's account. When you uninstall all paid apps, a banner displays all apps that were successfully uninstalled, and any apps that could not be uninstalled.
Viewing Rapid Deposit Information
The Rapid Deposit section displays the merchant's Rapid Deposit eligibility and the current status for both the partner and merchant.

| Field | Description |
|---|---|
| Partner |
|
| Merchant Setting |
|
| Eligibility |
|
Additionally, if your user account includes the necessary permissions, the Check Card Eligibility feature allows you to enter the first eight (8) digits of the merchant's debit card to check the card's eligibility to enroll in Rapid Deposit.